Introduction and background: Bicycle chains wear.
A worn chain can “skip”: when you pedal hard, it no longer engages the sprockets and your pedals jump ahead. Skipping can be inconvenient, and skipping at the wrong moment could throw you from the bike, hurting you.
Riding with a worn chain wears the front and rear sprockets faster than riding with a good chian. Sprocket wear gets faster even before the chain is worn enough to skip. Riding with a worn chain can save you money on chains, but you can spend more than you save due to buying new sprockets more often.
Wear takes power: a worn chain wears the sprockets faster, and that power comes from you. Thus, a worn chain is less efficient: more of your power goes to wearing things out, less of it to going forward.
Chains wear, but you can measure a chain and find out how much it is worn. A new chain is 1/2 inch (0.500”) pin-to-pin. The more a chain is worn, the longer the pin-to-pin distance.
A chain is worn out when it exceeds some pin-to-pin distsance. Wear is often described as elongation as a percentage. And a chain is worn out when the chain wear exceeds some limit. For example, a new chain is 0.500” pin-to-pin, and a chain is worn out when it is 1% longer, or 0.505” pin-to-pin.
The wear limit depends on the type of drivetrain.
Small amounts like 0.5% are hard to just see. Wear is also hard to estimate based on, say, distance or months ridden: the rate of chain wear varies a lot depending on lubrication and dirt, both of which are hard to see. Wear rates also vary a lot depending on the chain design and metal used in the chain.
Since wear is hard to see and hard to estimate, a measuring tool is useful.
As of 2009/10, many commercial chain wear measuring tools are inaccurate. Specifically, the drivetrain only “cares” about pin wear, but many tools report both pin and roller wear. Some tools thus tell you a chain is worn out (pin and roller wear is large) when the chain is just fine (pin wear is small).
This note explains why, and some ways to build an accurate tool.
See Chain Construction, Wear, and Measurement for how chains wear and how wear can be measured.
See Commercial Wear Measuring Tools for a tool that is accurate.
See Chain Wear Examples for more details on how chains wear.
See Single-Ratio versus Derailleur for differences between single-ratio and derailleur sprockets, and about chain wear and skipping.
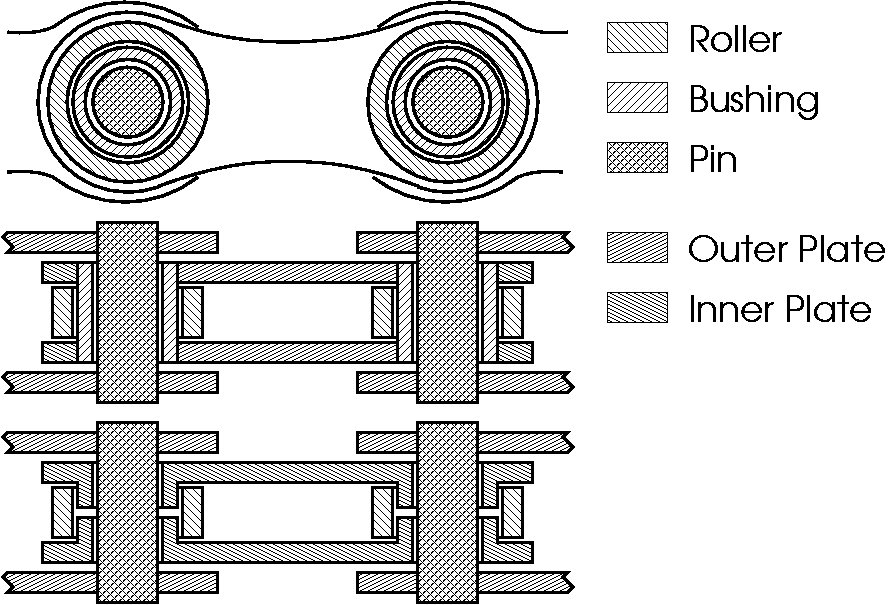
The following is a schematic diagram of a roller chain. The outer plates are pressed on to pins, forming a single unit. The inner plates are pressed on to bushings, forming another unit. Pins rotate inside bushings, allowing the chain to flex. Rollers are a hoops which rotate around the bushings, allowing the chain to roll easily (with low friction) on and off the teeth of sprockets.
In some ``bushingless'' chains (also called ``bushless'' chains), the bushing is formed from the same piece of material as the inner plates. The following discussion applies to both bushing and ``bushingless'' chains.
For the rest of this note, the term spacing refers to the distance between rollers. A chain has a nominal spacing. For example, new bicycle chains have 1/2-inch spacing, meaning the chain has a roller every 1/2 inch — 0.500 inches. As the chain wears, the spacing increases. For example, a chain for a derailleur bicycle is worn out when the spacing has increased by 1%, giving an actual spacing (spacing) of 0.505 inches.
The spacing depends on the size of the chain parts and also on chain tolerances. For example, rollers do not fit tightly around the bushing, and bushings do not fit tightly around pins. Thus, the chain should be measured under modest tension, and if roller-to-roller distance is measured, the rollers should be aligned so all tolerances are biased uniformly.
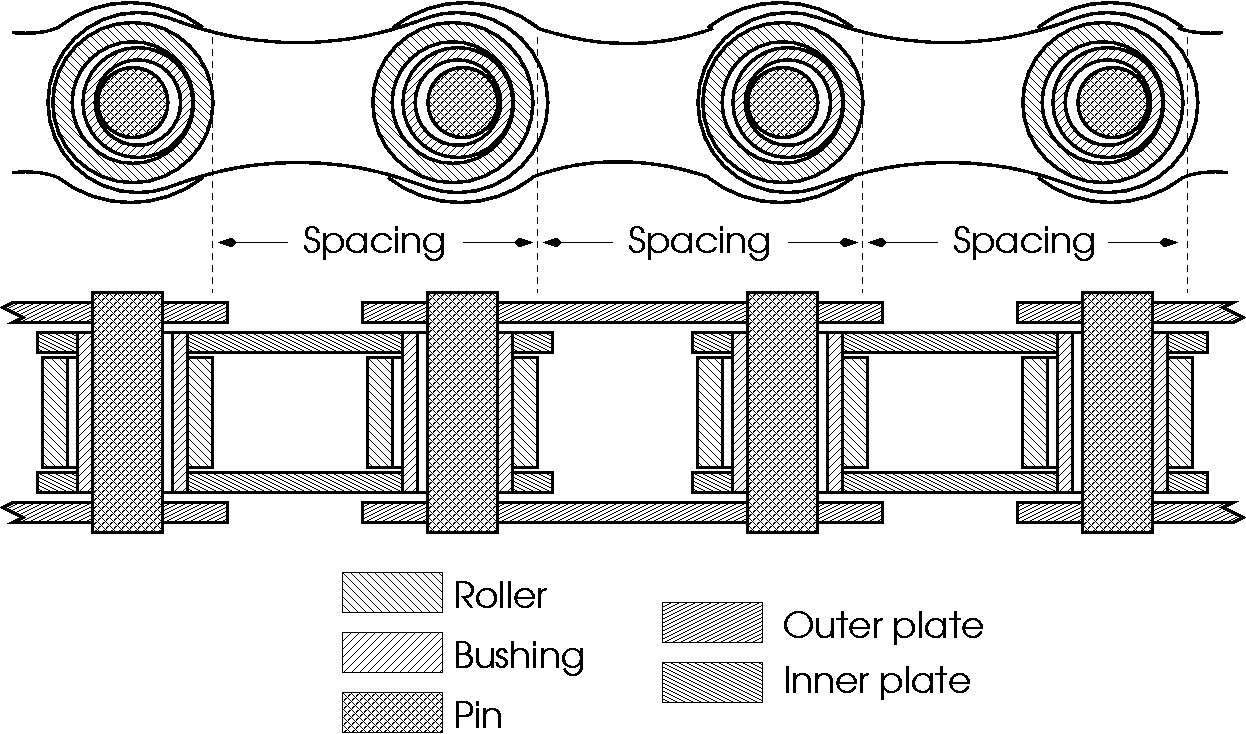
Note that a conventional chain has uneven dimensions. The pin-to-pin distance is fixed by the outer plates. Thus, two pins on the same outer plate always have the same spacing, no matter how worn is the chain. However, two pins connected by bushings and inner plates have spacing that is determined by the amount of slack in the bushings at both ends of the inner plate that connects them.
Sprockets have teeth (cogs) and the chain has rollers which rest on the teeth. The sprocket also has a spacing, which is the nominal distance between the faces of the teeth. Since the teeth are arranged in a circle, the tips of the teeth are farther apart than the roots of the teeth. The higher the roller rides on the sprocket, the greater the spacing. Thus, while the sprocket has a nominal spacing, it actually has a range of spacings, from the root to the tip.

Sprockets are typically designed so the nominal spacing is the distance between the teeth at the “roots”. As the chain wears, the spacing increases and the chain rides higher and higher on the teeth.
If the chain wears too far, it rides too high on the teeth and can damage the sprocket, and can also skip. Measuring chain wear is thus important so you can replace a worn chain before it causes further sprocket damage or makes the bike unridable or unsafe.
Note: the actual operation of chains on sprockets is more complex than is presented here. What is presented here is enough to describe chain wear, but is not enough to describe sprocket wear or the engagement of a chain and sprocket. See Single-Ratio versus Derailleur for more.
Let us consider chain wear in more detail. Wear occurs where surfaces rub. One wear surface is where the pin and bushing rub. As the bushing wears, the pin is able to seat more deeply, causing the chain spacing to increase. Similarly, as the pin wears, the bushing is also able to seat more deeply, causing the spacing to increase even more.
Pin/Bushing wear is shown schematically by A the following figure. Compared to the unworn chain, B, note that each pin has a wear indentation and that the bushing is worn thinner where it contacts the worn pin. Note also that the pin-to-pin distance is increased.
A subtle feature of the wear is that the distance between pins 2 and 3 is unchanged by wear, since that distance is held by the outer plates. However, the distance between 1 and 2 (and between 3 and 4) is double the total wear on each pin and bushing, because the pin-to-pin distance on inner plates depends on wear to both pins and both bushings.
A second wear surface is where the bushing and roller rub. The outer surface of the bushing wears and the inner surface of the roller wears. Such wear causes rollers to get looser and looser, and also causes rollers to shift relative to the unworn chain. However, the spacing of the chain remains unchanged.
The following figure shows
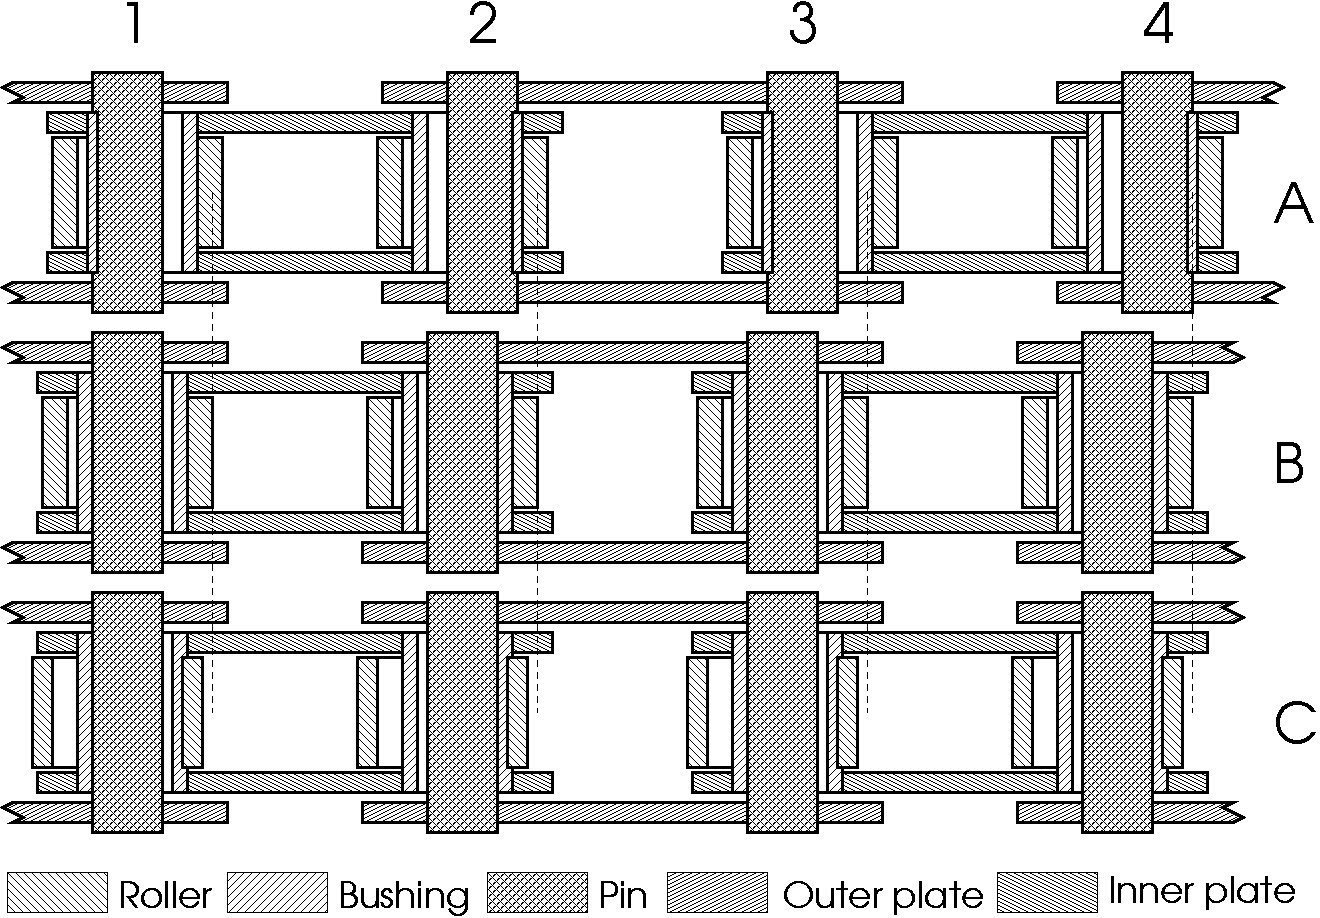
The figure is as-if the chain is tight and the chain is pulling to the right while trying to rotate a sprocket which resists by pushing the rollers to the left.
Bushing/Roller wear is shown schematically by C. Compared to the new chain B, every roller is offset slightly to the left, but the pin-to-pin distance is the same as new. That is, roller wear does not affect the chain spacing.
The important issue of chain wear is that the spacing changes, causing the chain to ride up on the sprocket teeth. Thus, it is important to measure pin/bushing wear. However, bushing/roller wear does not affect chain performance unless it becomes so severe that it affects structural integrity — the bearing is worn away, the roller fractures, or the like. Thus, bushing/roller wear should not be included in overall wear measurements.
The standard procedure for measuring chain wear is to hold a ruler against the chain. With 1/2-inch spacing chain, 24 links should measure 12 inches new; if 24 links measures 12-1/8 inches, the chain has worn about 1%.
The following shows a worn Regina CX-S and an unused Sachs chain. The Regina chain has the pin is aligned with the ruler at 23 inches. One foot away, an unworn chain would have the pin aligned to the 11 inch mark. However, this chain is worn so the pin is about 3/32 inch away. (It looks less, due to camera parallax distortion. Consider the links at 10 inches and 9 inches are much further from the inch marks.)
![[X]](Chain-mid-crop.jpg)
![[X]](Chain-str-crop.jpg)
![[X]](Chain-end-crop.jpg)
Using a ruler can be error-prone because it is necessary to hold the ruler precisely and measure one end while making sure the other does not slip. For that reason, several companies have developed chain wear measuring tools. The advantage of a special-purpose tool is that it is faster to measure wear.
A chain has many moving parts. All can wear, but only some matter for chain replacement. Notably, pin wear matters, but roller wear does not. Unfortunately, many tools measure both pin and roller wear. Tools that include pin+roller wear may say a chain as worn out, when the pin wear is small enough that the chain is still good.
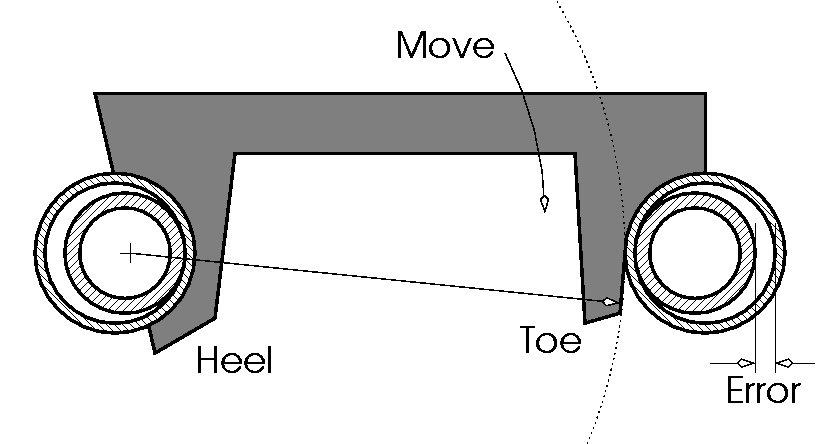
As shown in the following figure, an unworn chain with loose rollers adds Error to the measurement and thus gets reported as worn even though measuring with a ruler shows there is no spacing change.

To re-cap:
C has no pin wear and is good to use. But a tool that pushes the rollers in opposite directions will measure Error and report it as pin wear, even though roller wear does not cause skipping or sprocket wear.
A longer tool may suffer less from Error:
Suppose a tool measures over, say, 8 links (9 pins) and each has wear W, then the reported wear per link is (8 × W + Error)/8. If Error is similar to W, then it reports the chain is about 10% more worn than it really is. In other words, a chain which is really worn by 0.9% will be reported as having worn a bit over 1.0% (if W and Error are similar).
If, however, a tool measures over 24 links (25 pins), then the reported wear per link is (24 × W + Error)/24 — or about 4% more worn than it really is. In other words, a chain really worn by 0.9% will be reported as worn by 0.94%.
Note also that when there is W% wear at a pin/bushing joint, that shows up in measurement as 2W% wear between inner-plate pins and 0% between outer-plate pins. Tools must, therefore, measure an even number of links (odd number of pins) in order to provide an accurate reading: measuring an odd number of pins leaves it to chance whether you measure N inner and N+1 outer, or N+1 inner and N outer. (The above picture shows odd links/even pins — the wrong way — due to space constraints on the drawing.)
If a tool has errors but is conservative, chains are reported as worn-out when they still have useful service life, which increases chain costs.
If a tool has errors but is not conservative, then errors mean a worn chain can be reported as good, the worn chain is used too long, and leads to drivetrain damage.
Fortunately, commercial tools are conservative and never report a chain as good when it is actually worn. They may, however, report a good chain as worn, leading to increased chain costs.
Unfortunately, it is hard to estimate chain wear just based on distance travelled.
Chain life varies substantially with the type of chain, the riding environment, maintenance, and with the rider and type of use.
Further, service life may be short. Riders often report chain life for derailleur chains in the range of 3,000 km to 15,000 km or a range of about 5:1, and some individual riders report they see a range of 4:1 depending on the type of chain and riding conditions.
A test at http://www.velimpex.com/wippermann.htm and http://www.velimpex.com/2008promo/triatheletes_connex/chainwear-results-chart.htm reports "Each chain tested was mounted and identically run through the same test designed to simulate 3000 km on the road by a competition-level rider in 115 hours." The report does not describe the detailed methodology, but reports chain life from new to 1% stretch ranging approximately from 85 hours to 155 hours, correspnding to a range of about 2,300 km to 4,000 km.
The methodology does not report in detail how the chains were tested, so it is unclear what besides chain type influenced service life. However, the methodology should be consistent across chains in the test, and a range of roughly 2:1 is observed.
![[X]](TheBestChainWearByWipperman.png)
For reference purposes, a US$30 chain that lasts 3,000 km costs US$0.01/km, similar to the cost for tires. This is enough that just replacing the chain very often may meaningfully increase the cost of riding.
Cyclus offers two models, #720114 and #720062. Both push apart a pair of rollers; measurment error is like that of the Park CC-3 and Rohloff Caliber 2.
![[24267-33710-full-6619_3908_084313-193.jpg]](www.southwatercycles.com/smsimg/193/24267-33710-full-6619_3908_084313-193.jpg)
![[6634_3909_084348.jpg]](www.cyclesportsuk.co.uk/images/tools-bottom_bracket/6634_3909_084348.jpg)
The KMC uses two plates to push apart a pair of rollers. Measurment error is like that of the Park CC-3 and Rohloff Caliber 2.
![[X]](12691kmc_xl.jpg)
The Park CC-2 uses two pins that push apart rollers, giving a percentage wear indication ranging from 0.25% to 1%. Measurement error is like that of the Park CC-3 and Rohloff Caliber 2.

At least three chain wear tools are ``go/no-go'' gagues, the Park CC-3, Rohloff ``Caliber 2'' and the Sette ST-503. The idea of a ``go/no-go'' gague is that the tool fits (``goes'') if wear is too great; it does not fit (``no-go'') if wear is minor. The following diagram shows these tools schematically. The ``heel'' is set on the roller, then the ``toe'' is moved down. The outer edge of the ``toe'' is made to be precisely the distance for ``too much'' wear. Thus, the ``toe'' only fits behind the roller when there is too much wear. All three tools incorporate two go/no-go measurements. The Park and Sette are labeled "0.75" and "1.0", the Rohloff "0.075mm" and "0.10mm".
The ProGold Chain Gauge fits between rollers, and thus is subject to measurment error due to roller wear. It is similar to the Park CC-3 and Rohloff Caliber 2, but instead of being go/no-go, the ProGold reports percentage wear.
An alternative is very nearly the same design, but with the ``toe'' and the ``heel'' on the same sides of the roller. Again, the ``toe'' is placed precisely at the distance of too much wear. Thus, the ``toe'' only fits over the roller when there is too much wear. By placing both heel and toe on the same sides, no roller wear error is added to the mesaurement.
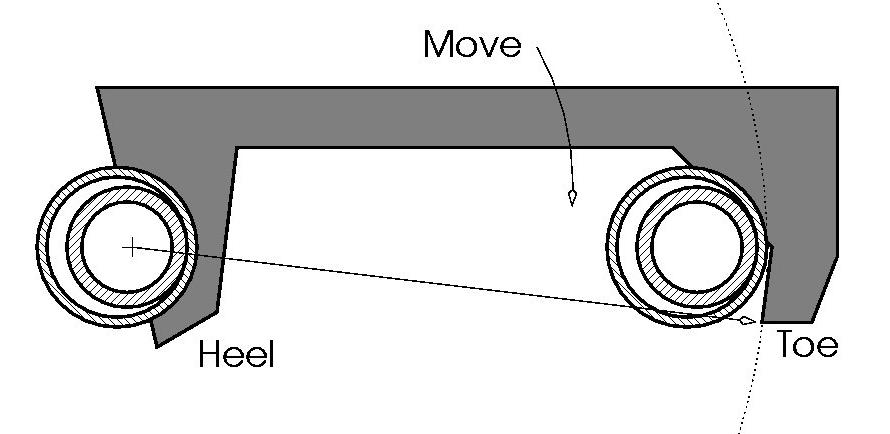
A disadvantage of the alternative design is that the toe tends to pull the heel away from the roller. Thus, it is necessary to push the toe down only gently. In other words, the inaccurate design can be used quickly. In contrast, the proposed alternative design requires developing some skill in its use. That somewhat reduces its benefit over the conventional design.
A ruler can be placed across pins, vertical edges of the side plates, or across "bulges" in the side plates. Tension the chain lightly while measuring.
From “Measuring Wear”, above:
Consider the lower chain in the picture above: hold the ruler aligned to the center of a pin at 23 inches. If the chain was unworn, then the pin at 10 inches would be centered. However, the chain is worn, so it reads about 1/8 inch below the 10-inch mark. In turn, the wear is about (1/8)/12 ≈ 0.010, which is about 1%.
Notably:
Some rulers have zero inches exactly at the end of the ruler, and you may be able to "hook" the end of the ruler on to a pin or edge of an outer plate. However, is also common that rulers have 0 inches before the end of the ruler, and the end is not a reliable offset from zero.
Rulers often have gradations coarser than 1/32” such as 1/16”, or in the picture above, 1/8”. However, you can reasonably interpolate. Interpolating hurts accuracy, but is not dependent on roller wear.
If you have a 12-inch ruler, then measuring at (say) 11 inches is is still close to 1/8” ≈ 1%. There are also longer rulers, such as 15-, 16- and 18-inches. A longer ruler makes it possible to measure beyond 12 inches (e.g., 12-1/16”).
Alternatively, if you remove a chain to clean and relubricate it, you can measure more links. Many bikes have a chain over 36”. If you measure over 3x the length of chain, then wear measures 3x larger:
If you hang the chain on a nail and measure the upper part of the chain, the lower part has enough weight to tension the chain for measuring.
A ruler measures true pin-to-pin distance and so is accurate for any roller configuration and any amount of roller wear.
Measuring wear with a ruler is somewhat cumbersome, since you need to
This "three hands" aspect of measuring with a ruler is one big reason for special-purpose chain wear measuring tools.
A third design is the Speedtech CW-1089, which is no longer (2008) available. It uses a hook to fit over the chain and a series of calibrated holes that are matched against the pin to indicate wear. This design approximates the good accuracy of a ruler, but is easier to use.
![[X]](img_c_1271.250.crop.jpg)
![[X]](img_c_1273.250.crop.jpg)
|
Pedal forward to tension chain for accurate measurement. Place chain wear indicator roller set tab on the chain roller. Pivot the tool until a chain pin aligns with a display hole. ![[X]](img_c_1273.500.crop-a.jpg)
Pass the chain through the width gauge slots on the top of the tool Choose the size that allows the chain to pass through it having minimum pin clearnace. ![[X]](img_c_1273.500.crop-b.jpg) Chain wear occurs at the pin and around bearing pivot points as the chain travels around the sprockets. The wear on the pins and bearing surface is measured as elongation — the more the chain wears, the longer it becomes. ![[X]](img_c_1273.500.crop-c.jpg) As chain wear increases, the pitch of the chain becomes greater than the pitch of the sprockets. causing fewer teeth to contact the sprocket teeth. This increases sprocket wear and decreases transmission efficiency. A worn chain can periodically catch on the tips of the rear wheel sprocket teeth, slipping over the sprocket before engaging. Slippage also occurs when a new chain is mated with a worn rear wheel sprocket. ![[X]](img_c_1273.500.crop-d.jpg) PO BOX 1377 MOUNTAIN VIEW, CA 94143 Copyright © 1990 | ||||||||||||||
Update/correction 2023/07:
The operation of the Speedtech is a bit subtle. The “roller set tab” is pushed down on to the chain, perpendicular to the direction of chain tension. That means two good things:
the tab tends to center on the roller, no matter the size of the tab cutout vs. the size of the roller; and
the roller tends to center on the bush (or bushless equivalent) no matter the amount of roller wear.
In turn, the ”roller set tab“ is positioned fairly close to the pin center for any amount of roller wear. It is still somewhat affected by bush and pin wear, so still not quite as accurate as a ruler.
The Speedtech is also longer than many other tools, and so the measurement error is also better-divided (over 18 links/pins; see Special Tools, above for how a longer tool can have less error).
Correction: I previously wrote “However, it relies on the distance between pin and roller, which may vary if rollers are a different size than the roller size used to calibrate the Speedtech.”, but that is wrong: pushing perpendicular to the chain tension tends to center the tool on the roller and the roller on the pin.
The Speedtech CW-1089 is no longer produced; and it provides a series of specific wear values, rather than a wear percentage.
A home-built alternative might be to modify free-sliding vernier calipers with "V" cutouts facing the top of the chain — one centered on zero on the fixed jaw, the other centered on the movable jaw.
To use, set the calipers to 10 inches, tighten the chain (push down on the pedal with one hand, as with the Speedtech), then press the V cutouts on to the rollers. The calipers will extend slightly according to the current wear and actual length.
By measuring over 10 inches nomial of chain (20 half links), 1% wear would be reported as 10.1”. Similarly, any other wear value W would be reported as 10.W”. Thus, the wear percentage could be read directly without changes to the vernier.
The Shimano TL-CN40 and TL-CN41 are accuarte, because both measurement points are on the same side of the rollers, so roller wear does not affect measurement.
The Shimano TL-CN40 and TL-CN41 appear to be identical except that the latter has instructions on a sticker on the tool. The TL-CN40 forces a center guide against the roller so that when a measuring guide is held against the chain, it measures on the same side as the loaded roller, thus measuring only pin-to-pin wear, as desired.
From http://www.bike24.com/p27116.html as of 2009/10:
Measuring proceeds as:
The TL-CN42 appears to be a modified version of the TL-CN40/TL-CN41.
![[X]](www.nnxsports.com/data/cheditor/1302/y12160000.jpg)
It appears the operation is to slide in the split "heel" at end (1) then gently drop end (2) to either go or no-go. It is thus similar to the proposed alternative.
The split end appears to be designed to ensure end (1) is fully pushed against the roller, to ensure alignment. It is thus like the TL-CN40/TL-CN42 pair (1) (2), while the TL-CN42 end (2) is like the TL-CN40/TL-CN41 end (3).
The Wipperman is a go/no-go tool that is placed on the chain. If it lies flat, the chain is worn 1% or more. Measurement error is like that of the Park CC-3 and Rohloff Caliber 2.
![[X]](wipperman.jpg)
The following photos show a pin removed from an in-service bushing-less chain. The pin corroded where there is not substantial wear, and shiny where there is wear.
The center section is significantly worn. The pin was originally smooth in the center but has worn where the inner plates rub on it, and there is now a significant center ridge. The photos also show a dark horizontal line, but this is an artifact of the lighting — in reality, the there are two broad shiny areas rather than four smaller areas.
The total width of the inner plate wear area is reduced by about 15% because the side plates do not wear all the way to the center. Chain wear is roughly proportional to area, so this represents about a 15% reduction in service life compared to ideal.
The smaller contact area also means increased pressure per unit area, and may result in higher chain friction.
The "side" photos also show the pin is shiny on the back side where the outer plates rest. In classic chains, the pin is held tight in the outer plates. The outer plate wear pattern shows this pin is somewhat loose and moves under load. Since the outer plate area is narrow, it will wear more quickly under a given load.
![[X]](img_c_7690.jpg)
![[X]](img_c_7694.jpg)
![[X]](img_c_7689.jpg)
![[X]](img_c_7701.jpg)
The following picture shows side plates with the bushing removed, to show the gap.
![[X]](link_2.gif)
The following picture (click to enlarge) shows worn and unworn chain links.
![[X]](wornunwornlinks.jpg)
Notably, the inner plates are quite worn where the roller rubs on it. This appears to be in part because the side plates are narrow where they contact the roller and the pin. Roller/bushing wear is not typically important for overall chain life (see above), but the narrow wear surface likely translates in to slightly higher friction.
The actual operation of chains on sprockets is more complex than is presented here. What is presented here is enough to describe chain wear, but not how a chain drive really works. For details, see a professional chains book, for example
``Chains for Power Transmission and Material Handling'' by the American Chain Association, published by Marcel Dekker, Incorporated, Copyright 1982.
“The Complete Guide to Chain”, Published by U.S. Tsubaki , editor Kyosuke Otoshi. 1997. ISBN-10: 0965893200 ISBN-13: 978-0965893206 . [https://www.ustsubaki.com/wp-content/uploads/the-complete-guide-1.pdf as of 2023/07] and [http://chain-guide.com/index.html as of 2023/07].
One part of operation is what leads to chain skip, which is one limit to maximum chain wear.
Consider a chain with tight side T1 and loose side T0. Figures below are from the Tsubaki book:
![[2.5.gif]](chain-guide.com/images/2.5.rotated-90.gif)
The difference between T0 and T1 is what is driving the rear wheel (rear sprocket) or your pedaling force going in to the chain (chainring).
The load on a tooth is complicated: "Chain Tension" is T1. "Tooth Force" is transferred to the sprocket, but is smaller than T1, so there is some remaining force "Link Tension" which is passed on to the next tooth.
![[2.7.gif]](chain-guide.com/images/2.7.gif)
So, for example, 90% of T1 goes to first tooth "tooth=1" and 10% is left in the chain as T2. Then, tooth=2 takes 90% of T2, and 90% of T2 is left in the chain as T3.
Note that
When you get around to the slack side, the chain skips if the slack side tension is less than T0.
How big is T0? It depends on T1 and on the fraction passed tooth to tooth. Above, I wrote “90%”, but really it depends on the sprocket design, and in particular on how steep is the face where the roller runs.
If the tooth is very steep, then the roller has trouble riding up the tooth, and so almost all chain tension goes in to the tooth.
In the picture above, “steep” leads to a small tension angle alpha (α), and so very little tension T2 gets passed on to the next tooth.
A steep face (small α) means a small T0 can run without causing chain skips. For example, just the derailleur's tension spring generates enough chain tension that the T0 side will engage without skipping.
However, a steep face also means high load on the tooth, including there may be high load on the tip of the tooth for tooth=1 taking T1. So a small α can lead to fast wear and broken teeth.
Conversely, a low α means T2 is large, and so the peak load on tooth=1 is less.
However, this comes at the expense that T0 must be larger in order to avoid skipping.
Single-sprocket drivetrains often use a larger α and require larger T0. The &ldoquo;slack” side of the chain is loose at low load, but under hard pedaling, the chain rides up the sprocket teeth and the “slack” side gets tight until T0 is large enough to force engageent without skipping.
For these reasons, a single-sprocket drivetrain can often tolerate more chain wear and also more sprocket wear than a derailleur. However, using a derailleur-type sprocket or a spring chain tensioner means the wear tolerance is less.
Finally, note that each chain link moves as it goes around the sprocket:
![[2.10.rotate-90.gif]](chain-guide.com/images/2.10.rotate-90.gif)
![[2.9.gif]](chain-guide.com/images/2.9.gif)
Thanks to Jobst Brandt for discussing chain wear, Regina CX-S photographs, and for reading and commenting on earlier drafts of this note. Thanks to Aaron Goss for describing the Speedtech.