Light Cassette Removal Tools
It is occasionally useful to remove a cassette (cluster of gears)
to replace a spoke or unjam a chain from between sprockets and spoke.
A light and compact lockring tool makes it possible to remove the cassette
during a ride.
Originally, the Pamir Hypercracker was the only such tool.
However, it is no longer available.
More recently, new tools have been introduced,
and several non-commercial units were developed as well.
This page reviews at least some of the tools developed as of 2008/01,
including both commercial and non-commercial units.
Note some hubs can be taken apart and the splined driver separated
from the hub shell, all with e.g., a pair of 5mm
Allen-head wrenches. Although the sprockets remain connected to the
splined driver, the driver separates from the hub, making it possible
to replace a spoke or free the chain without a lockring tool.
Circa 200, the Pamir Hypercracker was available as a road service
tool.
The Hypercracker fit between the lockring and frame,
and a "finger" rested on the frame
to hold the lockring while the cassette was turned.
The tool is no longer available.
It is unclear why, and thus unclear whether buying a used one is a good idea.
(There are some reports it broke occasionally;
there are also rumors the owner retired and closed the business;
it is relatively uncommon to need to remove the
cassette, so sales of even a perfect tool
will probably be modest.)
From http://www.bikepro.com/products/freewheels/fw_cas_tools.html
as of 2008/01:
![[X]](www.bikepro.com/products/freewheels/fw_jpg/c1_hypercracker.jpg) PAMIR ENGINEERING HYPER-CRACKER
PAMIR ENGINEERING HYPER-CRACKER
The Hyper-Cracker breaks free the outer lockring on inner threaded
HyperGlide cassette hubs. Neither bench vise or adjustable wrench is
required for its use. With the rear wheel removed, it slides into the
twelve sided lockring star, then the rear wheel is
re-installed. Pressure on the cranks revolves the wheel, until a vinyl
lever contacts the seatstay, at which point added pressure backs off the
lockring. The Hyper-Cracker has a 14 and 15 gauge spoke wrench cut into
it, for roadside spoke repairs. Weighs 41 grams.
|
Another picture, from
http://cgi.ebay.com/ws/eBayISAPI.dll?ViewItem&item=230354236842
as of 2009/07/05:
Another picture, from Doug R., 2013/08:
M-gineering
(under "Hard to finds", as of 2008/01)
offers the "Next Best Thing",
which is a one-piece cast tool
that fits between lockring and frame,
much like the Hypercracker,
but which has a "finger" going in the dropout slot
rather than resting on the frame tube.
The shorter arm means higher forces.
The dropout may be more robust than the frame
(thus able to accept higher forces),
but M-gineering warns of possible damage from using the tool.
In the pictures below, note the "block" to engage the frame
hangs inboard of the hole, with at least two effects.
First, depending on the dropout shape, it may cause frame engagement
only at a small radius and thus high force,
which may dent the dropout.
Second, the tool cannot be slipped over the QR.
M-gineering's liability insurance excludes the United States,
so it is only available in all other countries.
From http://www.m-gineering.nl/indexg.htm
as of 2008/01:
![[X]](www.m-gineering.nl/nbt200.jpg)
With the NBT2 you can pull the cassette from your freehub on the road
without other -heavy- tools. Invaluable if you need to replace a spoke
on a rear hub. Thus it has the same function as the predecessor NBT (and
the Pamir Hypercracker of old), but apart from that it is completely
different. It's lighter (26 grams), investment cast in stainless steel,
extremely compact, it will not damage your paintwork and it's cheaper to
boot. The NBT2 has no small parts to loose along the roadside, no fine
threads to cause problems and the high strength stainless steel will
ensure it will survive years of neglect in your tool bag and still come
up shining!
|
From http://www.m-gineering.nl/nbtg.htm
as of 2008/01:
![[X]](www.m-gineering.nl/nbtinst1.jpg)
![[X]](www.m-gineering.nl/nbtinst2.jpg)
![[X]](www.m-gineering.nl/nbtinst3.jpg)
The Next Best Thing mk2 removes cassettes on the road without extra
tools, eg to replace a broken spoke. The NBT2 is designed to fit Shimano
compatible lockrings (not Capreo). 8 speed Campagnolo lockrings are
slightly different, but for occasional use the NBT should work just
fine. The NBT cannot be used with conventional freewheelhubs. And the
NBT2 shouldn't be used with extremely lightweight aluminium
(Stupid-lite[tm]) racingframes: these have enough problems of their own.
Prior to first time use it is recommended to check with conventional
tools that the lockring hasn't been tightened way over the recommended
torque by some hamfisted mechanic.
Instructions
- Open the rearbrake.
- Engage first gear, eg engage the largest cog and smallest
chainring. put the cranks horizontal.
- Release the QR skewer, and remove the endnut and conical spring.
- Fit the NBT2 in the lockring and put the axle back in the
dropouts.
- Replace the skewernut (no need for the spring) and do up the QR
tight.
[Note: see below Comparison And
Notes why tight is important.]
- Ensure that the axle is fully home.
- Grab the cranks with both hands, and unscrew the lockring one
turn. If the bike is standing on it's wheels, it will want to ride
forward.
- The face of the lockring is serrated, a load ratcheting sound is
normal.
- Remove the wheel from the bike and remove the lockring by hand.
Fitting
- Take care when replacing the cogset that all cogs are fitted with
the wide spline engaging the corresponding groove in the
freehubbody. It is very easy to disturb the position of the endcog
when tightening the lockring, and this could seriously damage the
freehub. With the lockring handtight, the cogs shouldn't wobble
when spinning the freehub.
- To properly tighten the lockring, put the wheel back into the
frame. Gently (the wheel is a large lever) rotate the wheel
backwards to tighten the lockring. If you start with the lockring
handtight, 10' (45°-60°) is sufficient.
- Remove the NBT2, and replace the QR (the smallest diameter of the
conical spring goes against the axle).
- Check the rear brake.
|
Also fit between lockring and frame,
the Stein has a short arm and cylinder that rests on the
outside of the dropout, rather than the inside slot
(as with the NBT2) or on the frame (as with the Hypercracker).
It uses a second plate held by the quick release,
evidently to resist twisting.
Again, a short lever means high forces.
The earlier model is made of a spline pressed in a flat plate,
and Stein notes it sometimes failed.
Sometime in 2007, a new design was introduced in which the spline
and flat plate are machined from one piece of metal.
It is more reliable, but more expensive.
From http://sheldonbrown.com/harris/tools/cassette.html
as of 2008/01
![[X]](sheldonbrown.com/harris/images/stein-mini-lock.jpg)
Jim Stein came to the touring cyclist's rescue with the new Stein Mini
Cassette Lock tool.
Although this tool is a bit more expensive than the original
Hypercracker, it is lighter, smaller and made with more precision. USA
Now also available in Campagnolo-compatible model!
I was occasionally having a problem with them coming apart under
repeated loading so I have redesigned them. (it is miserable to have
such a tool fail just when it is needed!) They are now milled from
one piece of steel instead of using a pressed in insert. I increased
the price a bit as it is much more expensive to make.--Jim Stein,
September 2007
|
From http://sheldonbrown.com/harris/stein-mini-lock
as of 2008/01:
The Unior 1659 (formerly EDLI) again fits between lockring and frame.
It has a short finger that rests on the outside of the dropout
(as with the Stein).
As with the earlier Stein, it appears to be of 2-piece construction
and may be prone to similar failures.
From http://sheldonbrown.com/harris/tools/cassette.html
as of 2008/01
![[X]](sheldonbrown.com/harris/tools/images/tl137.jpg)
This pocket lockring tool from Unior is even smaller and simpler,
though it might not be quite as gentle on your frame's paint.
This handy tool also includes a 3-cornered emergency spoke wrench (fits
European size spokes.)
Slovenia
|
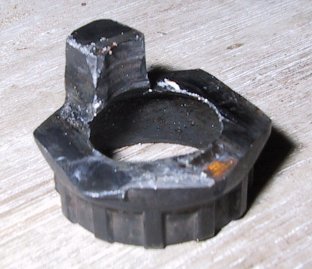
Jeff Ackerman made a tool
like an NBT2 but with less material.
It is constructed by first removing nearly all but the spline
from a non-portable tool,
then welding on a nub to fit the dropout.
From http://ohmelovelo.dnsalias.org/tools/tools.html
as of 2008/01:
![[X]](ohmelovelo.dnsalias.org/tools/Hypercracker.jpg)
This tool contributed by Jeff Ackerman. Jeff's description from T@H
slightly edited: Started with a regular Shimano cassette tool and ground
the large portion down so that it just fits between the cassette lock
ring and the dropout. Welded on a metal block that just fits into the
bottom of the dropout under the axle.
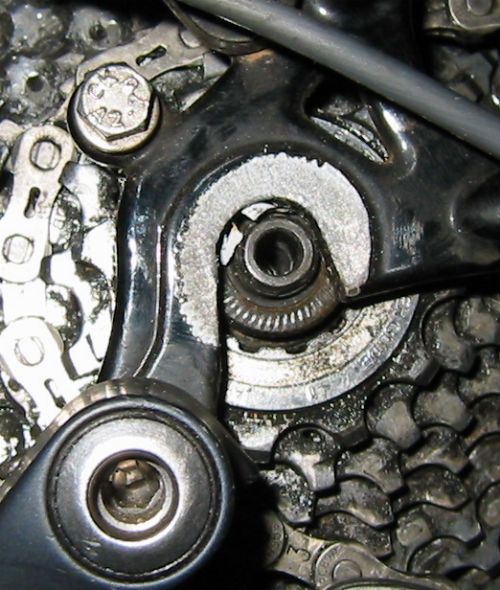
To use: remove the rear wheel, install the tool in the cassette lock
ring, reinstall the wheel with the metal block in the dropout slot, and
push the bike backwards now that the lock ring is linked to the
dropout.
[Note: backwards tightens the lockring; instead, pedal forward,
see NBT2 instructions, above.]
Stop as soon as the lockring loosens so as not to wedge the
tool against the dropout.
The tool weighs a fraction of an ounce, is smaller than 1” square is much
stronger than the original Hypercracker, and has no arm (like the
original Hypercracker) that goes over the chainstay to mar the paint. It
must be tailored to fit your specific dropout.
|
Jobst Brandt had a tool custom-made when he switched from
freewheels to freehubs (mid 2007).
Again, it fits between lockring and frame.
It uses a longer arm, though probably not as long as the Pamir,
and a Delrin cylinder rests on the frame.
Jobst notes the hole in the middle is large enough to fit over
a quick-release nut.
Mark and Juliette McLean made a tool like an NBT2 but with less
material,
and like Jeff Ackerman's but with no welding.
Like Jeff's, they start with a conventional cassette remover,
but unlike Jeff's the nub is made by simply not grinding away
material.
They warn dropout damage is possible.
The Hypercracker is a tool for removing the lock-ring that secures
Shimano cassette sprockets. This is necessary if a spoke breaks on the
cassette side of the rear wheel, or if the freehub needs to be removed
for maintenance. The 'official' tools for the job are a Shimano
cassette lock-ring remover, a big spanner and a chain whip - not the
most practical toolset for an extended tour!
Hypercrackers were invented by Pamir Engineering, who used to make
them. Sadly they no longer do, indeed I think the company was wound up
when its founder retired. To use a Hypercracker you remove the rear
wheel and fit the Hypercracker into the spline of the lock-ring. Then
you replace the rear wheel in such a way that the frame or dropout
prevents the Hypercracker rotating. All it takes then is a pull on the
pedals (by hand should be sufficient) which rotates the cassette and
rear wheel while the Hypercracker and lock-ring remain stationary.
Voila! the lock-ring is loosened and when you remove the wheel from the
bike you will be able to unscrew the lock-ring by hand and remove the
cassette.
I first saw the idea of making your own Hypercracker on another cycle
touring website: Ed and Jeanne Downing's. Their version involves some
welding which mine doesn't, but then mine puts more load on the dropout
and I did bend Juliette's dropout trying to release a very tight lock
ring. I was not popular until it had been hammered and bent back into
shape!
I took a standard Shimano cassette lock-ring remover and ground most of
it away so this much was left: [See image above]
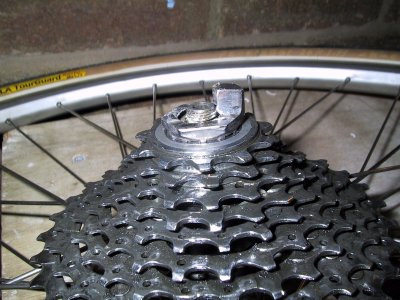
The stub sits against the dropout. I should think that if the
lock-ring was really tight there is a risk of bending the dropout. It
fits onto the lock-ring like this: [See image above]
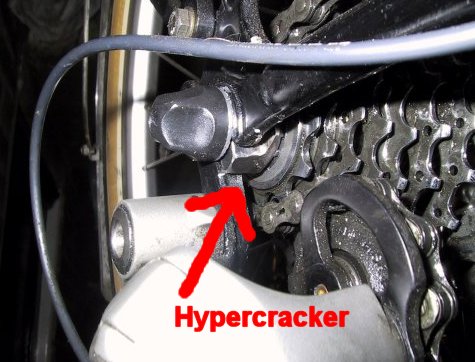
In use it looks like this: [See image above]
|
The Stein has several small parts which are easy to lose, especially
out on the road —two black metal "plates", a thumbscrew, an
aluminum barrel, and a small washer. Also, it is always desirable to
save weight and packing space, especially for a tool which is used only
rarely: the value of anything you bring might be seen as
(frequency-of-use)/(weight × space),
so the greater the weight and space, the more sensible it is to
leave it behind or carry something more useful else instead.
A Stein was modified by discarding the outer support plate,
griding away some of the material on the spline plate, and replacing
the thumbscrew, barrel, and washer with a single piece consisting of
an Allen-head (hex socket) bolt (with threads that match the Stein), a barrel
that is threaded and screwed tight to the bolt so that it cannot be
separated, and a piece of rubber tubing to better protect the paint.
Discarding and grinding away parts of the support weakens the tool
and places eccentric loads on the screw threads. However, the tool
appears adequately strong for this use, and using an Allen-head bolt
allows the barrel to be tightened fast, which allows all of the threads
in the plate to share the load.
(In contrast to the Stein shown on Sheldon Brown's site, this one has
a threaded insert; for this purpose, the effect is the same.)
The rubber tubing was conveniently at hand, but may be too thick to
fit all frames.
The Allen-head bolt and barrel can be reversed for stowing, allowing
the unit to lie flat in a tool case.
Note some tools will not work on some bikes.
Be sure to try it before you rely on it.
The Next Best Thing/NBT2 instructions
emphasize the quick release should be tight.
Clamping tight serves at least two purposes.
First, it keeps the tool where it is least
likely to damage the dropout.
Second, a tight QR increases dropout support, so it is better
able to handle loads caused by the remover,
thus reduceing risk of dropout damage
(for any NBT2-style remover).
However, on bicycles where the tool is a tight fit between
lockring and frame, clamping tight increases the force required
to unscrew the lockring, and it is unclear in general
when the increased load outweighs the increased support
and thus what is the best practice for all situations.
but note clamping tight is not simply for convenience.
Note also the Stein rests differently during use.
With all of these tools, as the lockring unscrews it forces
the tool in to the dropout.
Thus, once the lockring is freed, approximately 1/8 turn,
the quick release should be loosened to avoid damage to bicycle and tool.
On tools with the spline pressed in to the rest of the tool,
the spline may separate.
An example from
http://www.vwvagabonds.com/Bike/BikeSuccessFailure.html
as of 2008/01:
![[X]](www.vwvagabonds.com/images/BikeSteinHypercracker.JPG)
A chain whip and cog wrench are heavy tools
to carry on a bike tour, but we had to have
some way to remove the cassette in case we
broke a few spokes on the rear wheel or
broke some teeth on the cassette. So we
purchased a Stein Mini-Cassette removal tool.
One morning Rich tried to remove the
cassette from my bike. I heard a lot of
grumbling, and finally a loud crunch from my
bike and a "Oh no." from Rich. Fortunately
the tool—not my bike—broke.
While it is a beautiful design, it just didn't work
for us.
|
Note the current Stein design has the plate and press-in spline and
screw thread pieces replaced by a single plate with spline and thread
machined in directly (similar to the Brandt
design). However, be careful when buying you do not get old stock,
and note the Unior shown here might have the
same issue.
The above mentions the value of a tool for replacing sprockets.
Odds are good a shop with sprockets also has a tool
and will install sprockets cheaply.
There may be situations where sprockets are needed, available,
and a tool is not, but these situations are very rare.
Further, it is often possible to ride with broken sprocket teeth,
so the relative inconvenience is small.
Thus, if your hub disassembles easily,
there is little additional value to carrying a lockring tool
just to replace sprockets.
The following table briefly compares the tools.
Dropout notes whether force is applied so it tends to spread
the dropout.
Commerical indicates commercial availability as of 2008/01.
Flat stow indicates whether the tool stows flat,
which may be an issue if tools are carried in a small case.
Press fail indicates tools
where the spline is pressed in and may fall out in use.
QR Clearance indicates whether the tool can be used
without removing the QR, a slight convenience
(depends also on the QR).
Weight is approximate.
Notes are below.
Notes
-
The Ackerman has little material to
transfer load between dropout and lockring.
This may make the tool prone to break.
Also, welding may weaken the material,
though it might also make it more ductile and
less prone to crack.
-
The NBT2 is not available for new purchase in the U.S.
for insurance reasons.
-
Older versions of the tool use a press-in spline
and are subject to press fail.
Newer versions use a one-piece spline and plate.
-
The possibility of "press fail" annotation is based on
seeing one photograph that suggests two-part construction.
Thus, actual construction and risk for press fail is unknown.
-
The NBT2 has a large enough bore to fit over a QR,
except that the "block" to engage the frame hangs in
to that area.
The "Cassette Cracker" was the predecessor of the Hypercracker,
used to unscew the smallest sprocket on earlier freehubs which used
a thread-on sprocket rather than the later splined sprocket and
lockring.
From
http://www.bikepro.com/products/freewheels/fw_cas_tools.html
as of 2009/07/05:
![[X]](www.bikepro.com/products/freewheels/fw_jpg/b1b_cass_cracker_top.jpg)
![[X]](www.bikepro.com/products/freewheels/fw_jpg/b1_cass_cracker_side.jpg) PAMIR ENGINEERING CASSETTE-CRACKER
PAMIR ENGINEERING CASSETTE-CRACKER
The Cassette Cracker is a miniature chain whip for freeing up and
removal of the first position cog on freehubs where no outer lockring is
used to hold all the cogs on. Neither bench vise or adjustable wrench is
required for its use. It is an aid in cog removal for spoke
changes. With the bicycle chain on the smallest chainring and the
largest rear cog, and the right crank arm at the three o'clock position,
a vinyl coated steel hook grips the bike from the upper-inside of the
right chainstay.
A four link length of Sedis chain is then looped under and over the
top of the smallest rear cog. With forceful downward pressure on the
right crank arm, the small cog spins off, then take the wheel off to
remove the others. It's small enough to carry on the road and weighs 51
grams.
|
From http://cgi.ebay.com/ws/eBayISAPI.dll?ViewItem&item=330342363132
as of 2009/07/05:
Many bicycle tools are light, so easy to carry. Freewheel removers
are small, but need a lot of force to unscrew the freewheel. For shop
removal it is common to use a vise or a long wrench, but long levers
are usually heavy to carry.
In addition, it used to be common that cyclists would break spokes
while touring and away from their neighborhood shop. Thus, cyclists
faced the problem of replacing spokes on the flange next to the
frewheel. That is, it may be necessary to to remove the freewheel in
order to lace in a new spoke.
Options for on-the-road spoke replacement included headless z-bend
spokes, a hub with “keyhole” spoke holes, so spokes can be
inserted without removing the freewheel; use a large flange hub and
disassemble the freewheel using a nail and a rock (possibly losing
bearings and/or pawls); or carry a freewheel remover and try to find
somebody with a vise or large adjustable wrench.
The “Pocket Pro Pocket Vise” fits over a freewheel
remover's wrench flats; is held in place with the quick release
skewer; and the two prongs are placed over a sign pole or other
stationary object to use as a lever. The cyclist then leans on the
wheel (to hold the Pocket Pro on the pole) and then turns the wheel to
unscrew the freewheel.
![[img_5407_326b832c3e8461c56a7be541703ad9d2673427fb.jpg]](img/cimg7.ibsrv.net/gimg/bikeforums.net-vbulletin/1600x1200/img_5407_326b832c3e8461c56a7be541703ad9d2673427fb.jpg)
![[img_5408_71b1e173aa0d2e4d9a30ad36bb4bcf38704455ee.jpg]](img/cimg0.ibsrv.net/gimg/bikeforums.net-vbulletin/1600x1200/img_5408_71b1e173aa0d2e4d9a30ad36bb4bcf38704455ee.jpg)
![[img_5409_71d5ed45547bb9796496f75c5937fcb98d9c46fd.jpg]](img/cimg3.ibsrv.net/gimg/bikeforums.net-vbulletin/1600x1200/img_5409_71d5ed45547bb9796496f75c5937fcb98d9c46fd.jpg)
![[img_5410_6775e339322be6289250062397a38d79526c969d.jpg]](img/cimg5.ibsrv.net/gimg/bikeforums.net-vbulletin/1600x1200/img_5410_6775e339322be6289250062397a38d79526c969d.jpg)
![[img_5411_baf431f9a1e2c9f29da8b858412a9195262eda69.jpg]](img/cimg7.ibsrv.net/gimg/bikeforums.net-vbulletin/1600x1200/img_5411_baf431f9a1e2c9f29da8b858412a9195262eda69.jpg)
From https://www.bikeforums.net/classic-vintage/1182416-touring-freewheel-broken-spokes-2.html
as of 2021/06/13.
Freewheel remoers vary in the spacing of the wrench flats. There
were various models of the Pocket Vise suitable for use with specific
freewheel removers.
Red Clover Freewheel Key; use with remover using 1” wrench
flats. 150 grams, plus the weight of the freewheel remover.
![[s387390523383710784_p17_i1_w640.jpeg]](img/www.redclovercomponents.com/uploads/2/3/1/4/23146292/s387390523383710784_p17_i1_w640.jpeg)
As of 2021/06 this is listed as current production.
![[X]](ebay.com/hypercracker.jpg)
![[X]](pamir-hypercracker.dougr.2013-08-04_12.45.48.250.crop.jpg
)
![[X]](sheldonbrown.com/harris/stein-mini-lock/images/stein-mini-lock1.jpg)
![[X]](sheldonbrown.com/harris/stein-mini-lock/images/stein-mini-lock2.jpg)
![[X]](sheldonbrown.com/harris/stein-mini-lock/images/stein-mini-lock3.jpg)
![[X]](sheldonbrown.com/harris/stein-mini-lock/images/stein-mini-lock4.jpg)
![[X]](sheldonbrown.com/harris/stein-mini-lock/images/stein-mini-lock5.jpg)
![[X]](sheldonbrown.com/harris/stein-mini-lock/images/stein-mini-lock6.jpg)
![[X]](sheldonbrown.com/harris/stein-mini-lock/images/stein-mini-lock7.jpg)
![[X]](sheldonbrown.com/harris/stein-mini-lock/images/stein-mini-lock8.jpg)
![[X]](sheldonbrown.com/harris/stein-mini-lock/images/stein-mini-lock9.jpg)
![[X]](brandt/CrackerXX4X.500.crop.jpg)
![[X]](brandt/img_c_0396.250.crop.jpg)
![[X]](brandt/img_c_0399.250.crop.jpg)
![[X]](brandt/CRACKER.jpg)
![[X]](brandt/CRACKER_ISO.jpg)
![[X]](stein-0438.125.jpg)
![[X]](stein-0441.125.jpg)
![[X]](ebay.com/cassette_cracker.jpg)