![[X]](img_c_0399.250.crop.jpg)
Bikes rarely break while sitting in the garage. More often, they break while you are out riding -- due to accidents, the gradual accumulation of wear, and so on.
One question is: what tools to carry for repairs? Some general observations and pilisophical points:
One general observation here is there is no ``best'' solution, as failures are influenced by the bike, maintainance, use, and the rider. Moreover, every person has a different threshold for what failures they want to fix. That said, you can (a) do things to avoid failures; and (b) do things to cope with common failures.
It is putting the ``trailer before the bike'' to talk about tool kits without talking more about failures, but it helps to have something concrete in mind when discussing failures.
A big issues with bikes in general is weight, and that extends to the tools, too. Basically, each gram in the tool kit is a gram robbed from someplace that could make the bike stronger and less likely to fail.
Here is one tool kit:
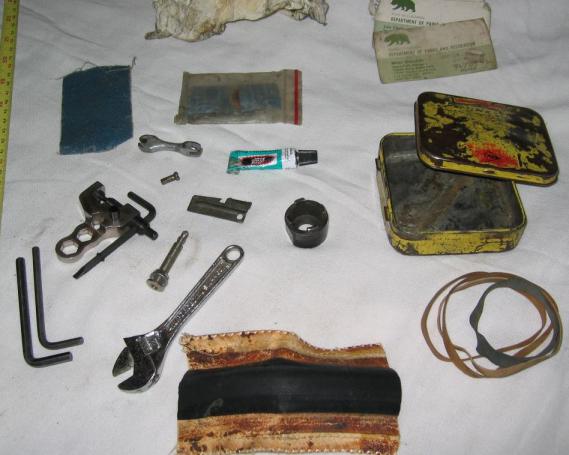
| Item | Weight |
|---|---|
| Ritchey CPR-9 with 4/5/6mm Allen-head wrenches, 8/9/10mm socket wrenches, screwdriver, chain tool, and spoke wrench | 47g |
| 3-inch adjustable wrench | 50g |
| Spoke wrench | 15g |
| Valve stem | 6g |
| 5mm Allen | 15g |
| 4mm Allen | 9g |
| Freewheel remover | 32g |
| P-38 can opener | 5g |
| Nipple | 1g |
| Belt-sander sandpaper | 3g |
| Tube patches | 5g |
| Tube patch glue | 3g |
| Tire boot | [??] |
| Business cards | 3g |
| Paper towel | [??] |
| Metal container | 44g |
| Rubber bands | 5g |
| Total | 244g |
Note that the total weight is the weighed total rather than the sum of the column entries. The sum may be different due to rounding errors, scale inaccuracies, etc.
A few notes about the tools:
A few notes about the bike, rider, and roadside failures:
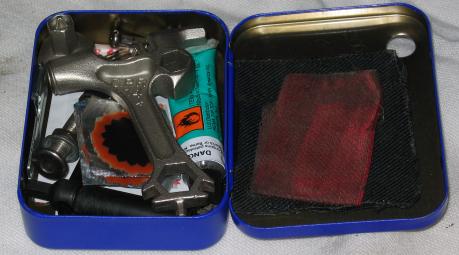
Here is another, inspired by Tool Kit A. It is about 2/3 the size and weight. It lacks tools for replacing spokes under the sprocket cluster. Note two sizes of nipples for both 2.0mm (14g) and 1.8mm (15g) spokes. Not yet time-tested.
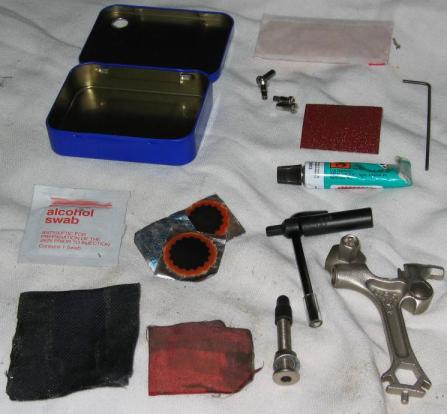
| Item | Weight |
|---|---|
| CPR-14+ with 3/4/5/6/8 Allen-head wrenches, 8/9/10/14 socket wrenches, flat head and Phillips screwdrivers, chain tool, spoke wrenches for 2.0mm and 1.8mm spokes, and a bottle opener | 74g |
| Plastic tube | 1g |
| Sandpaper | < 1g |
| Silk tire boot | 1g |
| P-38 can opener | 4g |
| Valve stem + cap | 7g |
| Glue | 6g |
| Small Allen | 1g |
| Tube patches | 2g |
| Alcohol wipe | 1g |
| Bandage | <1g |
| Nipples | 4g |
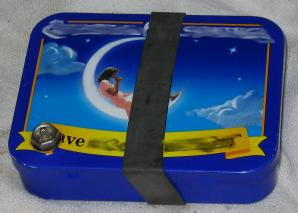
| Box | 27g |
| Rubber band | 1g |
| Total | 133g |
Note that the total weight is the weighed total rather than the sum of the column entries. The sum may be different due to rounding errors, scale inaccuracies, etc.
A few notes about the tools:
A few notes about the bike, rider, and roadside failures:
Here are some example multi-tools and discussion of their features and tradeoffs.
Among other things, older bicycles often use hex-head nuts and screws, whereas newer bicycles often use allen-head screws. Thus, the tools you want to carry depend quite a bit on the bicycle.
A related issue is what problems you want to be able to fix. Tool XYZ may have more wrenches than tool ABC, but some failures are rare enough there is no point for most riders in carrying a tool for it. Alternatively, it may be better to spend the extra grams on a part which is unlikely to fail, rather than carry a failure-prone part and tools to adjust it.
What you want to be able to fix may vary depending on whether you are doing short rides in populated areas or long rides in remote areas. Also, if your bicycle uses uncommon wrench sizes, you may want to carry them "just in case" — because it is unlikely you can borrow one from another rider. With some, such as 3.5 mm Campagnolo or 7 mm Pivo allen-head wrenches, even if you find a shop and it is open, it is unlikely they will have the wrench.
The Cool Tool is no longer made, but offers an unusual range of tools, so may be thought-provoking for "what tools do you want to carry?
Tools include 4, 5, and 6 mm allen-head wrenches; an adjustasble wrench with thin jaws that fits many smaller hex nuts and bolts including axle cones; a crank puller; 32- and 36 mm headset wrenches; and lockring spanner. It does not include a pin spanner, but Park "wire" tools are a relatively lightweight option.
![[X]](cool-tool.jpg)
The Crank Brothers Micra-17 includes 2, 3, 4, 5, 6, and 8mm Allen-head wrenches; T25 Torx, flat-head and Phillips screwdrivers, chain tool, four sizes of spoke wrench, and 8 and 10mm hex-head wrenches. It weighs 170g.
Some notes:
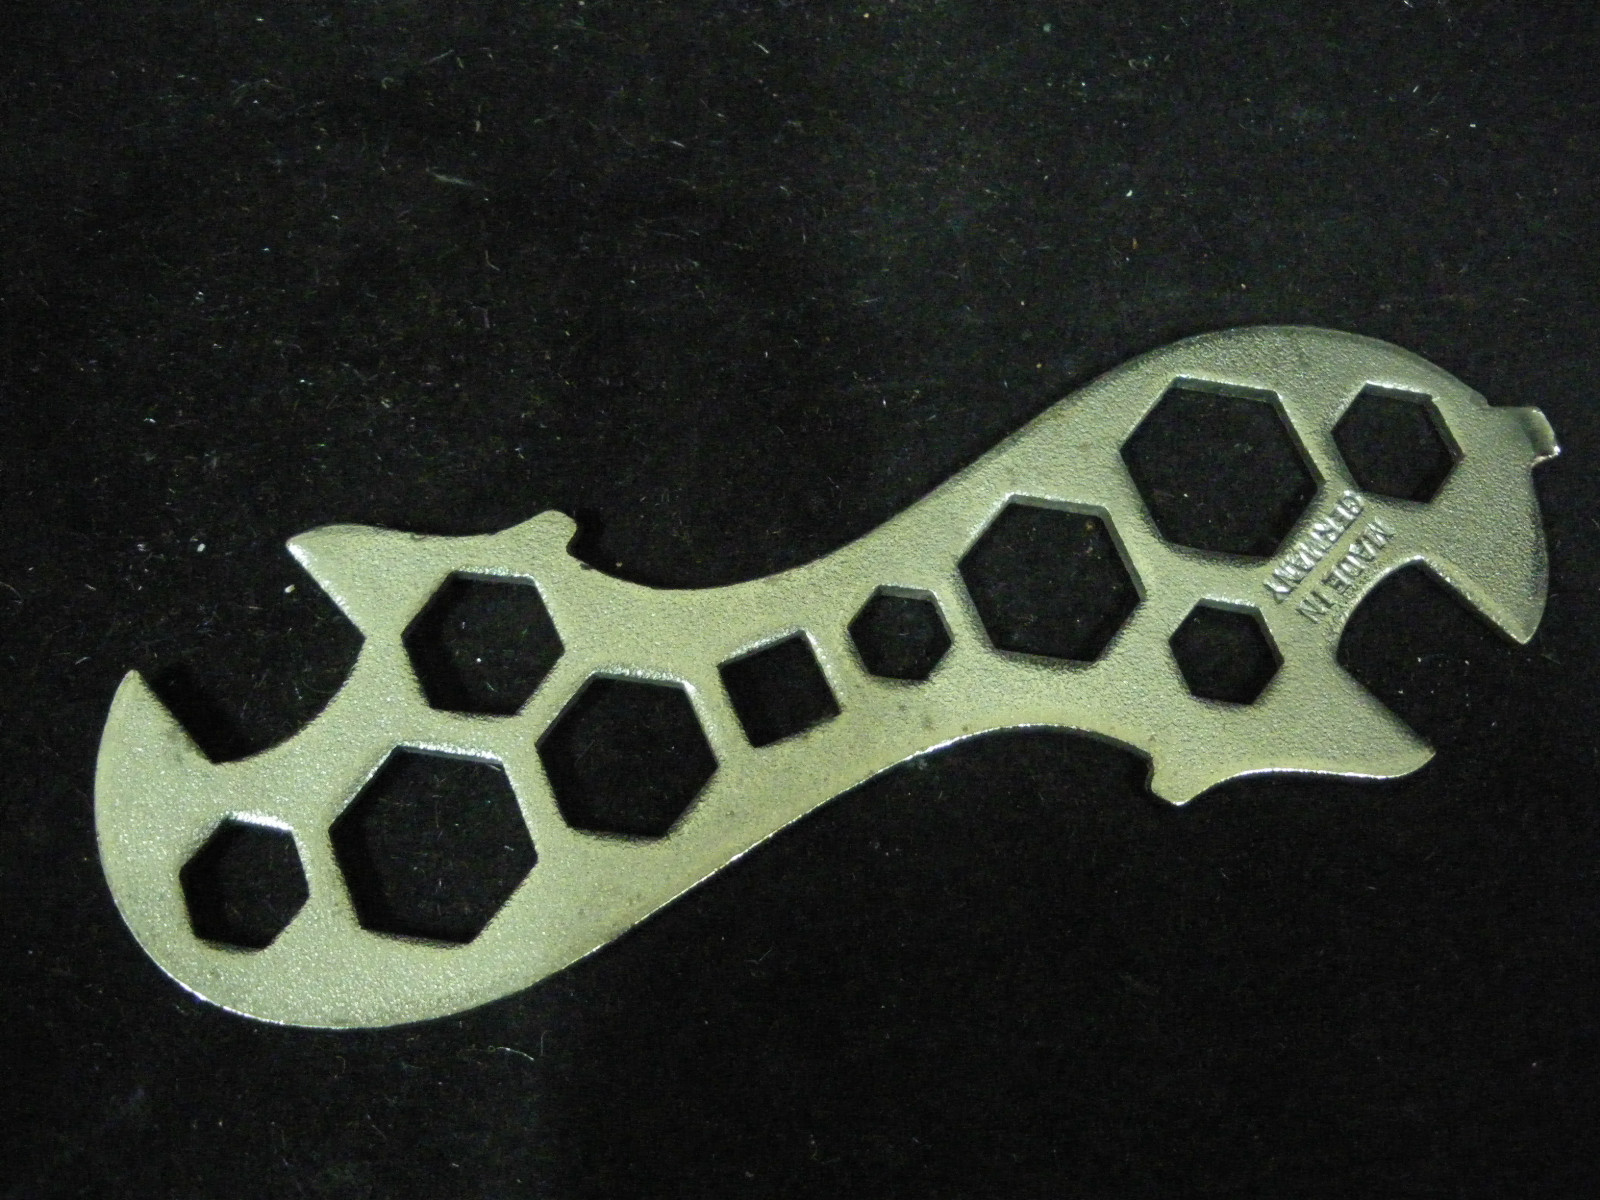
One class of traditional tools is various shapes stamped from steel, for example:
![[TX785_1.jpg]](i875.photobucket.com/albums/ab314/youkeshu/20130116/TX785_1.jpg)
A similar but different toll is shown here.
These tools can be cheap and light — the one shown above weighs 71 g and has an online retail price (as of 2013/04) of US$2.75 including postage.
These tools typically include various hex box wrenches, which are stronger than open-end wrenchs, plus open-end wrenches for pedals. They also often have a flat-head screwdriver and hook spanners. Note the example above places thook spanners close to the middle, which helps leverage on tools nearer the end, but hurts leverage for the hook spanner. Similarly, the wrenches near the center may ahve poor access for some bolts. For example, it may not be possible to reach some hex-head front derialleur bolts. The wrench also includes a square-head wrench, which is not common on modern cycles but may be a hold-over from wrenches made for bicycles in the early 1900s.
The Leatherman Mako is an recent version of traditional "flat strip" bicycle tools, with a 1/4-inch hex drive to fit standard interchangeable screwdriver bits.
![[leatpic831677.jpg]](images.wholesalehunter.com/prodpics/leatpic831677.jpg)
Weight: 44 g, of which 19 g is the flat strip portion.
Tools are: 1/4-inch hex, 8, 9(?), 10, 15, and 16 mm hex/box; 5 and 6 mm hex/Allen (socket/cap screw); #1 Phillips, #25 Torx™; and 14g and 15g spoke wrenches.
Although the tool in theory offers a 9 mm hex, in practice it grips the head poorly and may be useless.
Standard nutted axles are 15 mm, a size which is hard to find on other compact tools. However, the Mako lever arm is short and the tool is narrow, so it hard to apply a lot of force. (The lever arm is shorter than it appears: the center of the 15 mm and 16 mm sockets are about 25 mm in from the end of the tool, while the whole tool is about 100 mm long.) If you plan to remove axle nuts with this tool, you should probably install them using this tool, as they may be hard to remove after tightening with a standard wrench.
(For some uses, it may be best to replace the nutted axle with a hollow axle and a non-QR skewer using a 6 mm Allen-head wrench.)
The 1/4-inch drive is sometimes difficult to use because the bits are not retained in any way: they have no shoulder, so can fall out of the handle and get lost on the ground. Painting them a bright color before the first field use (neon pink or orange, for example) may be a good idea.
The Mako does not include some common sizes, such as 2, 3, and 4 mm hex. This is not surprising, as the bits appear to be off-the-shelf items and there is storage only for 4 bits. However, using double-ended bits could easily make this possible. Further, double-ended bits would presumably weigh less.
The 1/4-inch drive makes it possible to carry a set of bits customized to your bicycle. This is generally an advantage, as many bicycles have different sizes of fasteners. In particular, some sizes such as 8 mm and 3/8-inch are fairly heavy to carry the full Allen-head wrench, so carrying a bit of the proper size plus the Mako a handle may be a net weight savings.
For smaller drive sizes (e.g., 2 mm, 3 mm, #1 Phillips), it might be desirable to use a 4 mm standard "micro" hex drive. Unfortunately, the lanyard hole is closer to 3 mm.
The Mako is made of titanium, which should be more durable than aluminum of the same thickness, but the Mako is thin so may be damaged by steel fasteners and/or may cause damage to steel fasteners.
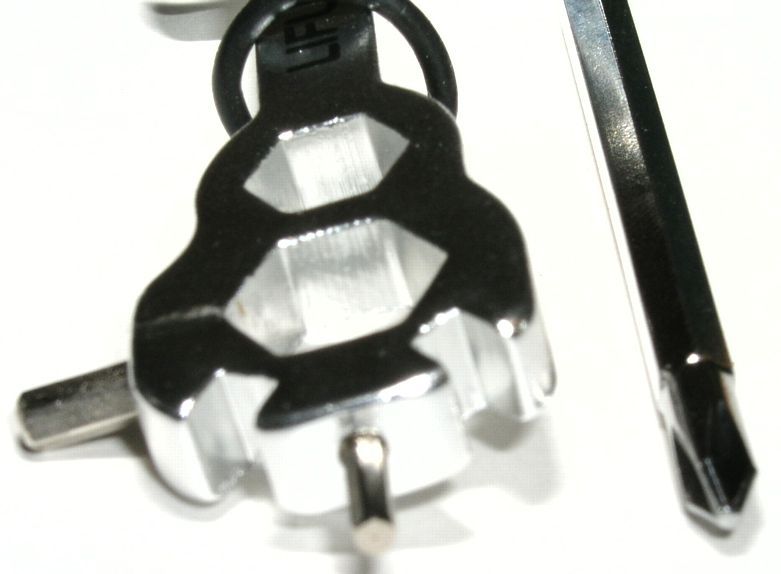
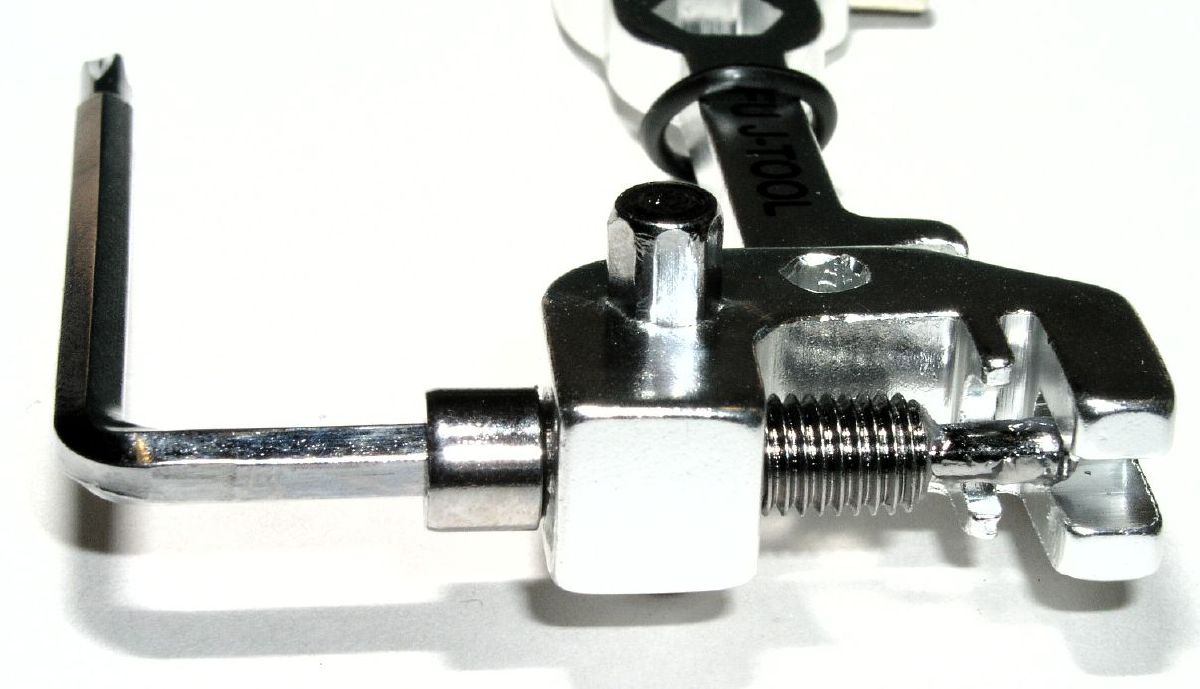
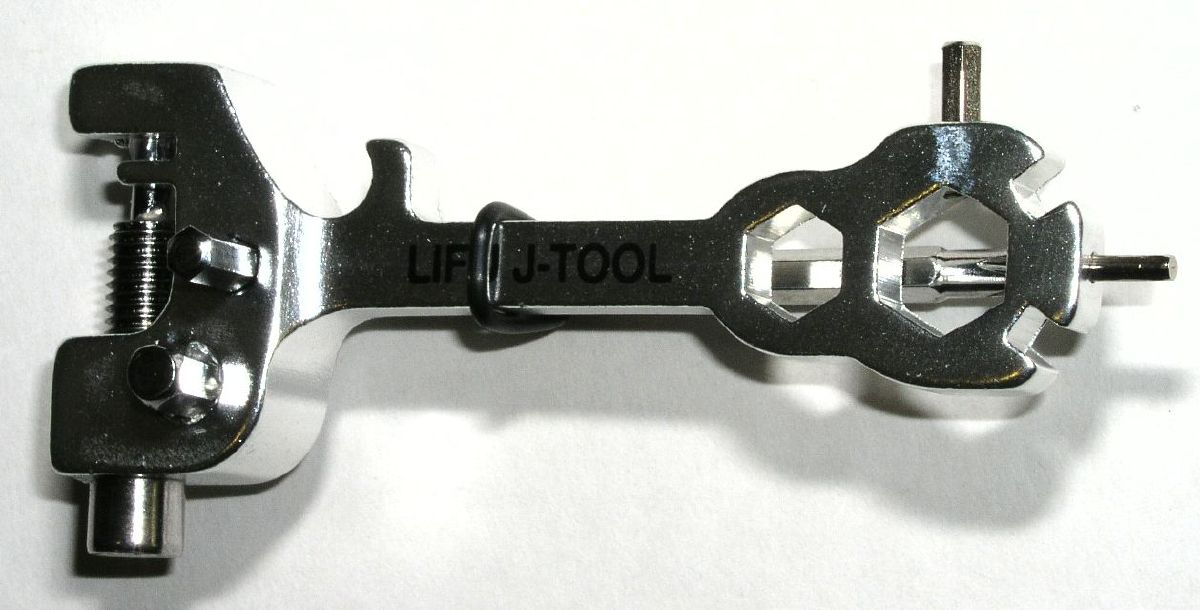
This is broadly similar to the Ritchey CPR-* tools, but while the Ritchey tools are out of production, the Lifu J-tool is current production as of 2013/03.
![[TL-12Multi.jpg]](www.srm-consult.de/teeth/TL-12Multi.jpg)
(Additional pictures: here, here, and here. From wcfanshop.com as of 2013/03).
Weight: 44 g.
Tools are: 2, 3, 4, 5, and 6 mm Allen-head; 8 and 10 mm hex/box; small phillips screwdriver; chain tool; and 14g and 15g spoke wrenches.
This does not have 14 mm socket or 8 mm Allen-head wrenches for square-taper cranks. This does not have Torx™ T-25 used commonly for disk brake rotors.
This does not have 1/4-inch drive commonly used for other tools, making it more difficult to extend this tool to special sizes.
Like the Ritchey CPR-* tools, this is "pointy" and might be best carried inside a tin.
Also like the Ritchey CPR-* tools, some tools are short and may not reach on your bike.
The Ritchey CPR-* tools typically include a steel "bed" for the chain tool. The Lifu does not. It is not clear if this is a durability issue.
As with some Ritchey CPR-* tools, the 8 mm, 10 mm, chain tool and spoke wrenches are aluminum not steel, so may suffer durability problems.
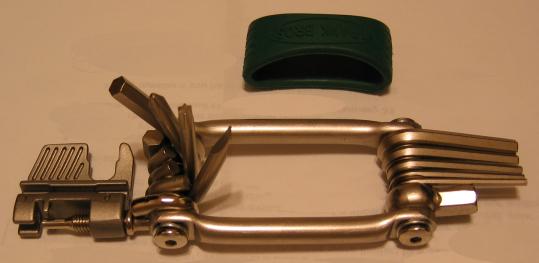
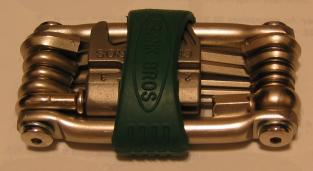
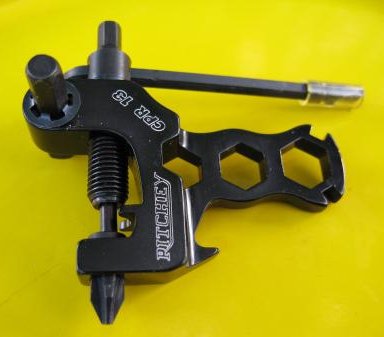
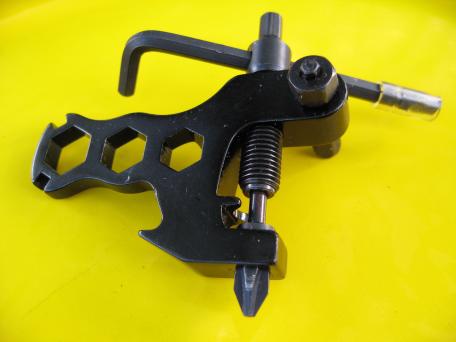
The Ritchey CPR- multi tools are among the smallest and lightest multi-tools, but have numerous compromises to achieve their minimalism. They are also discontinued (as of 2005/12) but there may still be a few around.
There are several models of the CPR- tools. The CPR-14+ includes 3, 4, 5, 6, and 8mm Allen-head wrenches; 8, 9, 10, and 14mm box socket hex-head wrenches; flat-head and Phillips-head screwdrivers; spoke wrenches for 2.0mm and 1.8mm spokes; a chain tool; and a bottle opener. It weighs 74g.
The CPR-13 is broadly similar but made of aluminum. The CPR-13 includes 3, 4, 5, 6, and 8mm Allen-head wrenches; 8, 9, and 10mm box socket hex-head wrenches; flat-head and Phillips-head screwdrivers; spoke wrenches for 2.0mm and 1.8mm spokes; a chain tool; and a bottle opener. It weighs 52g.
Some notes:
Although the Ritchey CPR- tools have numerous compromises, they do work and are lighter than many alternatives. For example, the Crank Brothers Micra-17 tool is about 170g -- 3¼x the weight of the CPR-13, 2.3x the weight of the CPR-14+, and 1.3x the weight of all of Tool Kit B. Comapred to the Ritchey CPR-14+, the Crank Brothers adds a 2mm Allen, a T25 Torx wrench, and two more spoke wrench sizes; but deletes the 9mm and 14mm sockets (and the bottle opener — use the Crank Brothers screwdriver if you care).
The Topeak Alien provides 2, 3, 4, 5, 6, and 8mm Allen wrenches; 8, 9, two 10mm hex-head wrenches, a 15mm open-end wrench, flat-head and Phillips-head screwdrivers, a chain tool, spoke wrenches for 2.0mm and 1.8mm spokes, two tire levers, a bottle opener, and a knife. It weighs 260g and comes with a nylon case weighing 30g.
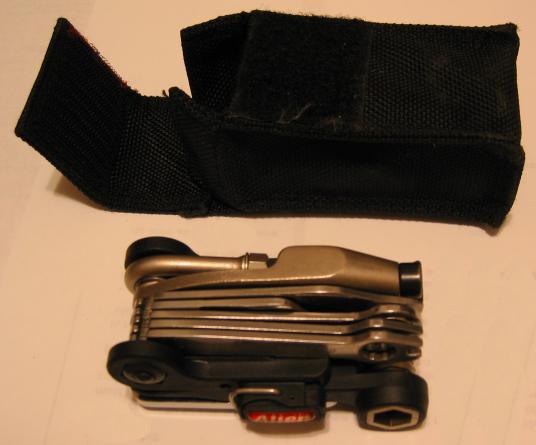
Some notes:
Compared to the Ritchey CPR-14+, the Topeak Alien is about 3.5X the weight, and about 2X the weight of the Ritchey-based tool kit. The Alien loses the 14mm socket but adds a 2mm Allen, a pedal wrench, and tire levers. It also has several duplicate socket sizes.
The Topeak Power 15 provided 2, 2.5, 3, 4, 5, 6, and 8 allen wrenches; 8, 9, and 10 mm hex wrenches; a flat-head screwdriver, spoke wrenches for 2.0 and 1.8 mm spokes; two tire levers, patches, and sandpaper. It weighs 62 grams plus 14 grams for the case.
There was an optional chain tool, weighing 29 grams.
![[X]](ic10574.125.jpg)
![[X]](ic10564.125.jpg)
![[X]](topeak-TRK-TO29-chain-tool.jpg)
Some notes:
| What | Why |
|---|---|
| 2mm Allen-head | Some older cable fixing bolts; some older hub and bottom bracket spacers, some reach adjusters. |
| 3mm Allen-head | Adjustable cleat tension |
| 4mm Allen-head | Water bottle, fender, and rack bolts. Some cable fixing bolts. Some brake pad adjusting bolts. Some cleat bolts. |
| 5mm Allen-head | Some cable fixing bolts. Many derailleur fixing bolts. Many brake pad adjusting bolts. Some brake fixing bolts. Many seatpost frame clamp bolts. |
| 6mm Allen-head | Rear derailleur bolt; most quill stem bolts -- binder and bar clamp; seatpost; some ahead stem bolts; many brake bolts. |
| 8mm Allen-head | Crank fixing bolts. |
| T25 Torx | Disk brake rotors. |
| 8/9/10mm box | Road bike brakes. |
| 14mm socket | Square-taper crank fixing bolts. Some use 15 mm but can be replaced with 14 mm hex or 8 mm Allen if no tool with a 15 mm socket is available. Note a crank also typically requires an "extractor" tool to remove the crank, but a crank fixing bolt wrench can be useful if the crank comes loose while riding. |
| 15mm open-end | Most 9/16-inch pedals. |
| Screwdrivers | Brake centering; derailleur limit stops; some brake reach adjustments. Most screws are both Phillips and slotted. |
There are always exceptions and oddballs.
| 1.5mm Allen-head | Some hub spacers |
| 2.5mm Allen-head | Some brake lever reach adjusters |
| ?? fractional-inch Allen-head | Marinovative brake cable setscrew. |
| 3.5&nsp;mm Allen-head | Some Campagnolo brake bolts |
| 6mm Allen-head LONG | Sweet Wings crank bolts |
| 7mm Allen-head | Some French stems |
| 9/64-inch(?) Allen-head | Some cable fixing bolts |
| 3/16"(?) Allen-head | Some locking headsets. |
| 5/32"(?) Allen-head | Old Bullseye hubs, cranks. |
| 7/16-inch Allen-head | Some Bullseye hubs. |
| 3/8-inch Allen-head | Old Phil Wood hubs. |
| 13/14/15/16mm thin open-end | Cup-and-cone axles |
| 15mm hex | Many bolt-on axles. |
| 15mm open-end | Many square-taper crank fixing bolts, consider replacing with 14mm socket or 8mm Allen-head intead. |
| 16mm hex | Some Stronglight crank fixing bolts; consider replacing with 14mm socket or 8mm Allen-head instead. |
| O/S nipples | Nipples for 13mm spokes, aluminum spokes, fiber spookes, recessed nipples, and other uses.. |
In addition to "size", length is also important. For example, many quill stems use a 6 mm Allen-head but it is recessed so requires a long wrench.
Bicycles sometimes use a lot of specialized tools in addition to various sizes of standard hex/Torx/screwdrivers.
From the standpoint of road repairs, one question is "what will you need to do?" If you really want to be able to handle every possible failure, you should be sure to carry along a TIG welder and heat-treating oven to repair frame damage. Clearly, then, there's things rare enough you do not expect to use them, but there may be cases, some listeded below, which are worth considering.
The next question is "What do I do?" In some cases you can switch the part to take a standard wrench. In other cases, you may be able to find a special wrench.
Some examples follow.
Chains occasionally break; a standard "get back on the road" is either remove a link and continue (derailleur, being sure to avoid the "tight chain" combinations) or insert a spare link (single-speed and hub gears).
Some chains work with "any" chain tool. Some chains you want to be sure to carry along the special "magic pin", as once a pin is removed it cannot be re-inserted. Or, rather, it can be reinserted but is so loose the chain will fall apart at the old pin in just a few kms.
A few chains require the pin is "peened" after installation, which requires a special chain tool. There are portable tools that peen chain pins, but most chain tools do not. Obviously this is good to check before you have a failure...
Many cranks are installed/removed with standard tools. Some cranks use a special "wavy socket" bolt that is similar to Torx™ but much larger.
Crank removal is sometimes useful to recover a chain which has fallen off and gotten jammed between chainrings and chainstay; and to pack and unpack a bicycle during shipping — as it is sometimes easier to remove the cranks than the pedals, or because the bicycle is packed in an especially small case.
One approach is to replace the bolt with an aftermarket bolt taking a standard wrench; a second approach is carry the special wrench. Note for some cranks Hope sells a small wrench which is a small flat plate to fill the gap. This is easy to lose, but nearly weightless and may be an advantage for groups, as it allows repairs to be done on any bike using the odd bolt, whereas the other choices only allow repairs on your bicycle. A third approach is to modify the existing bolt by drilling and installing a hex bolt to take a standard wrench.
![[Bolt with standard hex socket]](http://pardo.net/bike/pic/moms/0003-gram-wise-and-kilo-foolish/i.ebayimg.com/00/s/NjAwWDYwMA==/z/j~4AAOxyOlhSvW4C/$_3.JPG)
![[prod5145_IMGSET]](media.chainreactioncycles.com//is/image/ChainReactionCycles/prod5145_IMGSET.jpg)
![[ic3324.0625.jpg]](http://pardo.net/tmp/pnsc/ic3324.250.jpg)
When a spoke breaks, it weakens the wheel. Spare spokes are light, and so is a spare spoke wrench. Disk brakes may interfere with spoke replacement, but many are held by six Torx™ bolts.
For those held with non- or less-standard fittings, you are on your own (at least for now).
That leaves the sprockets on the rear wheel. There's broadly a few categories:
Fixed-gear: The most common attachment is a screw thread which requires a lot of force to unscrew. If you can get access to a vise (often at garages or by asking around) you may be able to "fake" a chain whip using your chain. Watch this space for details (maybe). However, sprockets are often held with a reverse-threaded lockring, be sure to check if you need a special tool.
Hub gears: Many hub gears have a hub flange large enough to replcae spokes without removing the sprocket. Some have a small flange and require sprocket removal. Sprockets are typically either threaded (screw-on) or splined. Threaded typically requires a special wrench and a chain whip. Splined typically requires a flat-head screwdriver to remove a wire C-clip.
Freewheel: A freewheel (different than a "freehub" or "cassette") screws on, much like a common fixed-gear. However, removing requires a special wrench as the freewheel ratchet prevents you from unscrewing it via the sprockets. Freewheels are often quite tight, so standard practice is to carry the specific wrench for your freewheel, then borrow a vise.
Cassette/freehub — sprocket: There are broadly two kinds of cassettes: for one, the smallest sprocket screws on and holds the rest. To remove this, you need to hold one of the larger sprockets and unscrew the small one. This style is less common today (2013). Unscrewing is often done easily with two chain whips, but may be hard otherwise. A main "portable" tool, the "Pamir Cassette Cracker" is not currently made, but it may be possible to find one used or make something similar. See here for details. Alternatively, some have used two runs of chain to different chainrings (with multiple front chainrings), one rotating the cassette forward, and the other rotating the smallest sprocket backwards. Watch this space for details (maybe).
Cassette/freehub — lockring: Another style holds the sprockets with a lockring that screws on just outboard of the smallest sprocket. There are several tools for removing this; all broadly similar to the Pamir Hypercracker: the cranks pul the sprockets forward, while the tool holds the lockring using the frame and keeps it from rotating, thus causing the lockring to unscrew. See here for details.
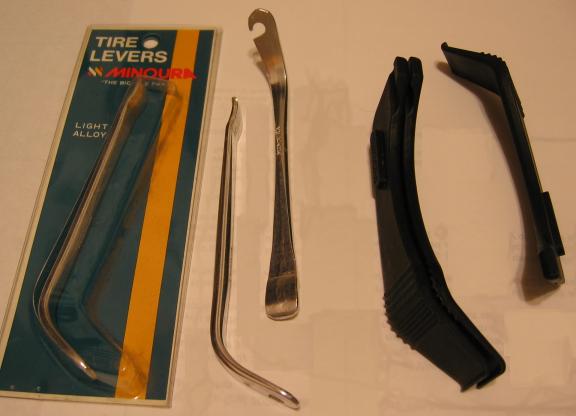
For most cyclists, flat tires are the most common bike failure. Tire tools include: tire levers, sandpaper, razor, patches, glue, spare tube(s), casing boots, and pump.
Many cyclists find that many tire/rim combinations fit tightly and that tire levers are useful for separating the casing from the rim. Flat tires are one of the most common failures, so many cyclists carry tire levers.
Although there are some one-piece tire levers, most people carry at least two levers. Using three typically makes it easier to remove tight-fitting tires. Note, however, that many ``tight'' tires can be loosened by first pulling tight a part of the bead (where you are trying to remove the tire) and then pressing the rest of the tire bead towards the center so the bead drops in to the deepest part of the rim.
Some multi-tools include tire levers. If separate tire levers are required, there are many choices. Some features of note include:
| Brand | Notes | Weight each |
|---|---|---|
| Minoura | Aluminum | 9.5g |
| Specialized | Snap together for convenient storage. | 14g |
| Brand | Notes |
|---|---|
| Home-made | The simplest patch is a piece of rubber trimmed from an inner tube, then glued using normal cement. The patch must be cleaned before use (see Sandpaper). Results are best if the patch material is thinner than the tube, if the patch is nearly round, and if the edges of the patch are cut at a bevel. Together, these features help ease stresses between the thick patched region and the thinner non-patched region. Even with these features, a home-made patch is often inferior to a commercial patch, which can make a more gradual transition. That said, if you have two flat spare tubes and no patches, cutting up one tube to make a patch to for the other is probably a better deal than staying stranded. |
| Park Glueless | ``Glueless'' patches have a reputation for peeling off. I have applied and used only one Park patch. It lasted through nearly five years of occasional use (in rotation with other tubes) on an MTB tire typically pumped to about 30 PSI. The patch stayed put, but the base patch material was less flexible than the tube and eventually the patch developed many splits and the original puncture started leaking again. It was difficult to remove the remainder of the patch, and also difficult to remove the remaining glue. The replacement (Rema) patch stayed put. |
| Rema | Rema is the ``classic'' tire patch,
with a flexible and thin edge.
Properly applied, a Rema patch is
durable enough to last far longer than
it is typically desirable to keep using
the tube.
Rema patches from bicycle stores are
typically 25mm, but 16mm is also
available; the smaller patch is slightly
smaller and lighter to carry; may be
cheaper; and induces less rolling drag. |
Some notes on applying patches and carrying spare tubes:
Tread and sidewall cuts often lead to blowouts, and where they do not, they still expose the tube directly to debris, etc. which does not bother a tire casing but which can puncture a tube. While carrying a full spare tire is often impractical, it is just a few grams to carry a casing patch which is semi-permanent and can last hundreds of miles for minor casing damage, and which can ``get you home'' for more serious casing damage. A casing patch is commonly called a ``boot''.
Cuts damage the cords which support the tire load. So even minor damage (a few millimetres) should be monitored from ride to ride for change. If needed, a boot can span cuts of several centimetres, though tire pressure may need to be reduced and the cut should be monitored for worsening during the ride.
A boot spans a section where the tire cords have been cut. The cords carry load, and without them, tire pressure will tend to push the tube out the resulting hole. Thus, it is important that the boot is relatively inelastic (non-stretchy). At the same time, the casing flexes with every revolution of the tire, and so the boot must be flexible.
The need for flexibility can be demonstrated by placing a business card between tire and tube. In a short distance (say, ten kilometres) the card will be shredded.
Some common boot materials:
| Money | Money is typically printed on ``paper'' with a high fabric content. Although money is poor boot material compared to others, it is often available and will do for a short distance. |
| Fabric | Many fabrics will do, but the fabric must be fairly inelastic (non-stretchy), as a stretchy material will just come out the hole rather than supporting the tube. Some people use scraps from old clothes; another choice is boots from heavy-duty ``raw'' silk -- cost about US$10 from a fabric store for a piece 25cm by 100cm -- enough to make many boots. |
| Tire casing | Tire casing is thicker and heavier than fabric. It is thus better able to span a long cut, but is more likely to make a lump. Tire casing is also coated with rubber, which increases hysteresis (rolling drag) but also makes the boot more durable against road debris. |
A boot is often installed by gluing with patch cement to the inside of the casing, in order to keep the boot from moving during installation. When the cut is near the bead, one edge of the boot can sit under the bead, though care should be taken the bead is seated properly and that the boot does not interfere with the brakes.
An ideal pump is compact, easy to use, fills the tire quickly, and is resistant to grit and other abuse encountered on the road. What is most important depends on the rider, equipment, and environment. For example, if you rarely have flats and are not racing, it may be acceptable if it takes several minutes to reinflate the tire. For frequent flats and racing, inflation time may be more important.
Many compact pumps fill the tire slowly. The proper way to compare pumps is the time needed to pump a given tire from flat to a given pressure. For example, the time needed to inflate a 26x2.25 tire to 40 PSI, or the time to inflate a 700x28 tire to 120 PSI. Regrettably, the following table does not include that information, but that is not difficult to measure. Note that time to pump to a low pressure is not a good indication of the time to pump to high pressure, so testing should be on the actual size tire you use.
Some pumps require high force to achieve high pressure. Whether this is an issue depends on technique and strength.
Many compact pumps are difficult to hold, making it hard to achieve the needed pressure. A pump that is hard to hold may worsen problems with valve stem tear-out, when pumping forces are transferred to the valve stem. The ease or difficulty of holding may vary greatly with hand size and strength.
Perhaps suprisingly, some compact pumps are as heavy as some full-size pumps.
Pumps are usually plastic or aluminum. Plastic is often less durable, but compact pumps are often stored out of harms way so durability is less of an issue.
Some pumps have a valve locking mechanism so the pump can grap the stem firmly and does not fall off accidentally. If the pump has no locking mechanism you may want to use a nut on the valve stem so that the pump does not push the valve in to the tire casing, leading to a poor seal.
Inflation needs vary with tire, rider weight, riding style, and usage. As example, even a heavy rider on thin tires might find acceptable a low-pressure pump, such as one that is compact but difficult to use. However, a ligher rider with fatter tires who rides back roads or woods may want a pump that can easily achieve high pressures: under-inflation may lead to more flats, and the rider may be tired and thus have difficulty using a compact pump at the end of a vigorous ride.
| Pump | Notes | Weight |
|---|---|---|
| Blackburn Compact | 2-stage telescoping so to a short pump has a long stroke. The small-diameter stage compresses first, so low pressures pump at low force and high pressures at high force. Thus, it is difficult to achieve high pressure. | ??g |
| Crank Brothers Power Pump | Small, and switches between high-volume/fast fill and high-pressure/slow fill. Despite that, it takes a long time/many strokes to achieve substantial pressure. Also requires a special technique to hold the pump. Has "lock to stem" feature, but tends to come disconnected anyway during pumping. | 97g |
| Silca Impero | The ``classic'' road bike pump. Plastic construction, non-locking chuck. The Silca has a reputation as difficult to use and self-destructing suddely, especially by tire pressure shooting the pump handle out of the barrel. Trained users get good service from the Silca and it pumps up a tire quickly. | 140g (55cm), 125g (39cm) |
| Topeak Master Blaster Micro Rocket AL | Very small and light. Hard to hold. Presta only. | 65 g, but easily reduced to 55 g and slightly easier to use |
| Topeak Road Morph | With a hose, to reduce valve stem tear-out; with foot rest, to make it easier to pump. Smaller than frame pumps but larger than seat bag pumps. | 206g (pump), bracket 19g w/o zip ties, 25g w/ full-length zip tie |
| Zefal hp | Popular alternative to the Silca, the Zefal hp has an aluminum body and locking mechanism. The hp has a ``frame fit'' shape at only one end, so the other end requires a pump peg. | 185g |
| Zefal hpX | A ``frame fit'' version of the Zefal hp. The hpX has a return spring lockout mechanism so you do not fight the frame-fit spring during pumping. Some find the handle less comfortable than the hp. | 223g (x2, 47cm), 252g (x4, 58cm) |
| Zefal Solibloc | A traditional alternative to the Silca, the Zefal Solibloc has an aluminum body and connects to the valve stem with a flexible hose. The flexible hose is stored in the handle and screwed to the body for use; the seal is prone to age and should be renewed periodically for relable service. The rubber hose is similarly prone to age and should be renewed periodically for reliable service. Zefal no longer makes the Solibloc, making renewal "iffy". The hose attaches to the valve via a thread-on adapter, making it slightly slower to use than a Silca Impero or Zefal hp. However, for typical non-racing use the time difference is ignorable. The Solibloc requires two pump pegs; Zefal at one point sold plastic pegs of good durability and security, weight about 10 g for both standard and large sizes. | 130-135g for 465mm model, not including pegs. |
![[X]](c1261.250.crop.jpg)
The CBPP is compact pump and uses a switchable low-pressure/high-volume or high-pressure/low-volume mechnaism. It has both presta and Shrader heads, both with locks, and an air valve that allows single-acting or double-acting pumping. Weight is about 97g. It is current production (as of 2008).
60 PSI is relatively easy to achieve (700x32c) but higher pressures are difficult: the pump is so small it is difficult to hold, and the stem lock is not secure, so the pump gets disloged.
![[X]](c1253.125.crop.jpg)
Silca Impero pumps are of simple construction — the head consists of a captured flat rubber washer; it screws in the pump barrel, which is a plastic tube with a cap at the far end; the plunger is a rod with seal at one end and handle with spring at the other. Silca pumps are presta-only. The pump is shaped as a "frame fit" pump that needs no other bracket. Weight is approximately 140g (55cm). Current production as of 2008.
The barrel of the pump is comparatively large diameter. This provides rapid filling of the tire, good for race condtions. However, ti also requires correspondingly higher force, more than many riders find they can apply. The lightweight construction also makes the pump fragile if used incrrectly. Comon failures are cracking or crushing the barrel under side loads and forcing apart the body and plunger when there is back pressure.
The Silca has been used successfully for decades by some riders, but adequate strength and proper technique are both needed for good results. Silca pumps are not currently (2008) widely used.
The Micro Rocket is a small presta-only pump, roughly 20mm diam. and 160mm long. It weighs 65g. A carbon version weighs less.
The Micro Rocket is advertised as "up to 160 PSI". In practice, 60 PSI is easily and quickly reached (700x28c), but higher pressures are difficult even though pump force is still modest. The difficulty is the pump is so small both the barrel and the handle are hard to hold with average hands. The difficulty holding may contribute to valve stem tear-out.
Consider modification to reduce weight and improve hand-friendliness.
![[X]](c1238.125.crop.jpg)
The Topeak Road Morph has a pump body connected by rubber hose to the tire chuck. A "foot pedal" folds out of the pump and the handle folds sideways to make a small "T". Approximately 230g. Current production as of 2008.
The hose between pump body and tire makes it difficult to damage the tire valve. Tearing theh valve stem from the tube is a common failure when repairing flats. The hose also allows the pump to be used like a small floor pump, allowing good compromise between strength required and pumping time.
These properties come at the expense of relatively high weight.
Zefal HP pumps have a thumb lock to the valve and an aluminum barrel. The head can be configured for either presta or Shrader valves, though switching at roadside is somewhat cumbersome as it is easy to lose small parts. Approximately 187g plus brackets. The Zefal hp is not a current-production item (2008).
The Zefal hp was long a standard alternative to the Silca. The Zefal hp uses a smaller-diameter barrel, perhaps half the area of the Silca Impero, so the Zefal hp is easier to pump but requires more strokes. It uses an aluminum barrel and heavier construction. The head incorporates a check valve so back pressure from the tire cannot force apaprt the body and plunger (a common problem with Silca pumps). Thus, Zefal hp pumps have a good reputation for durability. The thumb lock is convenient, but with improper technique makes it easier to damage the valve. It is not a frame-fit pump, and requires a pump peg; earlier models used a metal "basket" (??g), later models a plastic clamp (approx 6g).
The Zefal hpX is a frame-fit version of the Zefal hp. It is of similar construction except the plunger handle shape fits the frame and incorporates a longer spring with a mechanism to disable the spring during pumping. The barrel is available in four lengths. Approximately 225g (x2, 47cm), 250g (x4, 58cm). The Zefal hpX is not a current-production item (2008).
The hpX is similar in function to the hp but comes at a substantial weight penalty given the major difference is the use of a pump peg and the hpX has a less-comfortable handle. A pump peg is less "clean", but this seems minor. Added complexity may also make the pump less reliable (unclear).
An older pump, no longer in production.
![[X]](img_c_8102.crop.250.jpg)
The basic design is a thin-wall aluminum barrel with a conventional plunger and connecting to the tire via a flexible hose and screw-on fitting.
The basic design is "common", with many older pumps sharing the same basic design. The innovation of the Solibloc is a lightweight aluminum barrel; some similar designs use a plastic or steel barrel, which compromises durability or weight.
Specifically, the aluminum barrel makes the pump more durable than the Silca Impero.
The flexible hose and seals are prone to deteriorate with time and use. If replaced periodically, the pumps give good service. The Solibloc, however, is no longer in production, making replacement parts hard to find.
Historically, the general design was used widely but was quickly replaced when the Silca Impero, Zefal hp, and other such pumps became available. Probably this is because "rigid" pumps will often give service even if ignored, but flexible-hose pumps may need periodic renewal. Unfortunately, "rigid" pumps are more prone to valve stem tear-outs. With newer materials and designs, flexible-hose pumps are again becoming available, for example the Topeak Road Morph.
The Silca Impero has a larger barrel and so pumps a tire faster but requires more force. The Impero also uses a quick on/off chuck, making it faster to fill tires. For non-racing use, the difference in time to fit the flexible hose can probably be ignored.
Many pumps are presta-only or Shrader-only; others convert but are cumbersome because they are designed to be configured once for one bicycle and that's it. For example, the Topeak "Micro Rocket" is presta-only.
Also, while some pumps conveniently do both presta and Shrader, they might not be as good a choice for some riders.
One common adapter screws on a presta valve and allows use of a Shrader pump or a Shrader chuck on an air compressor (though beware the tire may fill very quickly and blow off). These tend to leak along the threads between adapter and presta valve; better models have an O-ring seal to reduce leakage. There may be some leakage even with a seal, but it is is usually small enough for proper inflation with common pumps. Best practice is to try the adapter before you need it, and with several valves to check for leaking.
Below is a picture (via AliExpress.com) showing how the adapter is used: loosen the presta nut, then screw on the adapter and inflate with a Shrader pump.
![[488762342_555.jpg]](i01.i.aliimg.com/img/pb/342/762/488/488762342_555.jpg)
A less-common adapter screws on a Shrader valve and allows use of a presta pump. The adapter appears to be simply a tapered tube, but it also needs to depress the Shrader center "button" without letting air leak out, so the adapter has a "pad" to press on the button. A check valve keeps air from leaking out; and a seal between stem and adapter. When the adapter is unscrewed a tiny "puff" of air escapes, but not enough to change the tire pressure.
The Silca 2220 is one such adapter and weighs 4-5 grams and can be carried conveniently in a portable tool kit. The check valve is esential to working right and could get gummed up with junk from carrying. Thus, you may want to carry it inside something, such as a bit of tubing. Or, below is a rubber cap over the presta end and a plug in the Shrader end.
![[Silca 22220 presta/Shrader adapter]](ic9436.crop.jpg)
The black rubber cap is from a hardware store; it is a "foot" for the end of a household rack made of wire, also to protect people from exposed screw threads. It is slightly trimmed. The plug is a cut-off piece of an old Shrader valve stem with the valve core removed and replaced with a setscrew, 5 mm long and 5 mm diameter thread and 0.8 mm pitch. The setscrew is a loose fit and is held with LocTite™ red. The plug is screwed in gently (to avoid damaging the adapter's rubber seal) but the setscrew ensures it can be removed even with cold/wet/etc. hands.
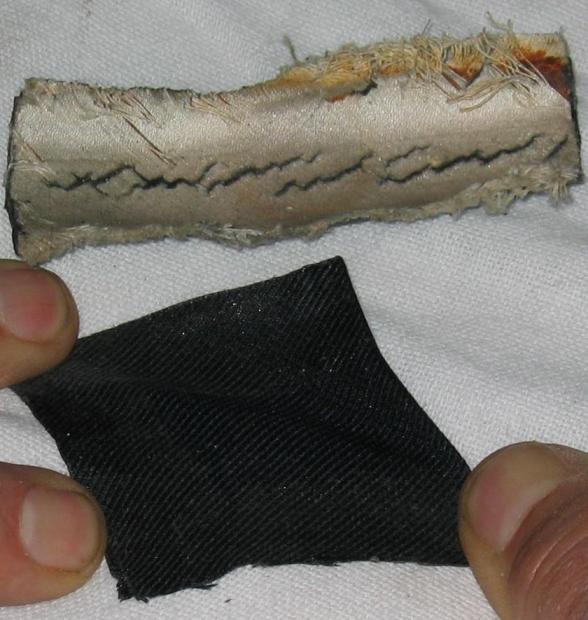
Even tools can fail. In the following picture, the upper item is a boot made from an old tubular tire. It shows severe tearing even after relatively little use, although some boots can be quite durable.
The lower item is a doubled piece of silk fabric being stretched to show the kind of flexibility which is needed to have a boot survive inside a tire casing.
Pumps are often neglected. Following a flat tire, one tire pump would no longer inflate the tire. The pump was disassembled, lubricated with lip balm, and reassembled. It then worked. In another situation, the tire would inflate, but only very slowly The tire was pumped up (slowly); the pump head was later disassembled and cleaned of accumulated gunk. Periodic pump inspection could have averted both of these problems.
Proper tube patching technique is necessary to ensure the patch sticks and stays sticked. Proper technique includes:
Since a tube should be allowed to sit after patching, it is good to carry a spare tube as well as a patch kit. I often carry two spare tubes. On the first puncture, if the ride is within 20km of done, I often skip the patching step until after the ride, unless further flats seem likely due to the ride course (pinch flats, thorns, glass washed out by rain, etc.). As a result, I very rarely patch on the road.
For most riders, flat tires are the most common failure. Thus, preparing for a flat tire -- both tools and techniques -- is probably the most important thing to do and will cover a majority of failures.
Another common source of failures is loose parts and things which have been damaged for a long time and which could have been replaced if only it was known they were falling apart. Thus, regular inspections can dramatically reduce the number of road repairs. Common preventative service includes re-tightening of nuts and bots to proper torque -- except crank bolts on square-taper cranks, which are damaged if the bolts are re-tightened.
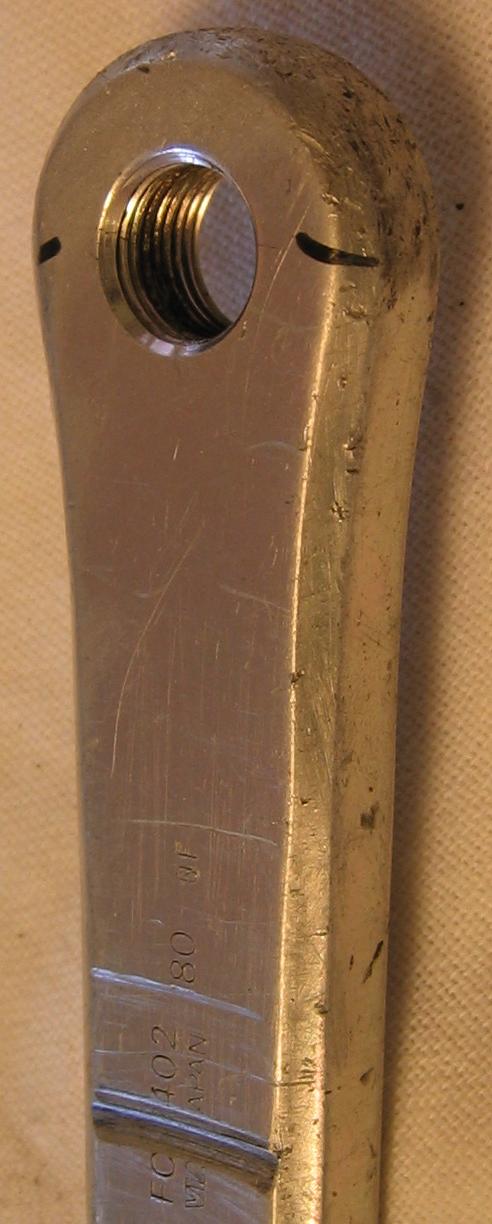
Preventative service also includes careful inspection for cracks, gouges, and so on. Note that many parts give good service even with substantial damage. As an illustration, the following crank was severely gouged by accidental contact with the front derailleur, yet it gave reliable service until finally the pedal eye cracked. Thus, the most important thing is typically to look for changes such as new or growing cracks, and when you do find them, ask somebody qualified to evaluate the problem.
Another common issue is clamped parts where the clamp slips during an accident. The right tools allow the part to be repositioned. Often, simple Allen-head and hex-head wrenches are all that is needed, but beware that some parts have recessed bolts or have fasteners positioned near other parts, making it impossible to use some wrenches with some fasteners. Thus, it is desirable to carry wrenches for all common fasteners and ensure that the wrenches can reach all fasteners. For example, some stems use a recessed 6mm Allen-head bolt. Although most multi-tools include the needed wrench, some shorten it to save space and weight, and some will not reach. Since only some bikes use recessed bolts, the tool still works for most bikes.
Chains fall apart regularly on modern 8/9/10-sprocket derailleur systems. Also, if the rear derailleur fails -- which happens sometimes due to a stick catching in the rear spokes -- then the chain can be shortened to finish the ride. For these reasons, it is desirable to carry a chain tool; if the chain requires special pins, spares should be carried, too.
A wide variety of other problems are possible. Some people carry extensive tool kits. especially on trips where a single delay can upset multi-day plans, and where the lack of a ``home'' set of tools makes it more critical to carry a fuller set of tools. However, be aware that it is not possible to prepare for all failures (except to carry a spare bicycle), and that preparing for the most common failures will keep you riding most of the time.
The following describes various failures, how they were handled, and some lessons for preventive service, tools to carry, and so on.
Photographs January 2004, January 2008.
| Item | Weight |
|---|---|